Lydia, oh Lydia, say have you met Lydia? Lydia the tattooed lady?
Because I've gotten pretty comfortable with transfer, this was a shoe where I wanted most of the adornment to be just glitter and time. And, hoo-boy, the transfers for this one took some time. I posted some transfers in progress a few days back. Here they are finished (2014 on the rose banner, MUSES on the heart banner) with a few new ones:
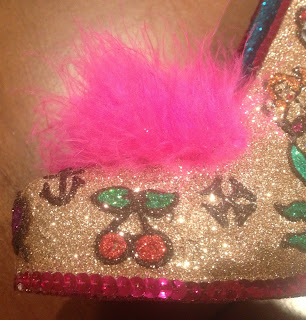
I tried to find tattoos that were recognizable without a lot of fine detail (you can only get so fine with the puff paint). That mermaid kicked my butt...I traced her about 6 times before I was happy with her outline. I also tried to do some tiny ones to make it easier to fill in the space. My research is mostly here.To keep them consistent, they're all outlined in Recollections, color "espresso." The base shoe was glittered in Martha Stewart "smokey topaz" on the exterior, Recollections "peacock" on the interior, ArtMinds hot pink on the sole, hot pink sequin trim on the edges and a little puff of hot pink marabou. Once the transfers were at long last all done, I laid them out so they totally covered the shoe and glued them down with E6000.
Here's the finished shoe (lots of pictures, because there's a lot of detail):
Because one of the more common tattoo options is a quote, I wrote "Happy are they whom the Muses love" in script and glued it inside the shoe as a little hidden bonus message.
And, finally, here are a few close-ups of some of my favorite tattoos on this shoe:
 |
| Rose with "2014" banner |
 |
| "MUSES" in tattoo font |
 |
| Classic swallow |
 |
| Double cherries! |
 |
| "MUSES" heart and saucy red-headed mermaid |


Gorgeous! Your shoes are works of art.
ReplyDeleteThank you so much!!
DeleteSo the entire transfer is done with puffy paint? How do you get such good coverage between the traced lines? I've just started using this technique.
ReplyDeleteYes, all the "tattoos" are just Tulip 3D paint and glitter, I wanted to see how a shoe just covered in transfers would turn out. For these I traced some print outs (and did a few of the simpler ones free-handed) with puff paint covered in glitter and when they were dry just filled in the outlined areas with paint (one color at a time, letting each color dry overnight before adding a new one). There are a few spots where the coverage isn't perfect, but it doesn't wind up showing much. I did the Hubig's pie transfer like this (outlines, then filled in). It takes some practice, especially if there's some fine detail in the image you're tracing. I had to scrap the first Hubig's pie man I did because my lines in the face were so thick he didn't look like anything.
DeleteYou also start to get a sense of what's a reasonable level of detail to try for (I could never get anywhere with the red head on the Hansen's logo for the snowball shoe). I honestly should've given up on the mermaid, I was just being stubborn! Touch-ups are also not uncommon.
The other way to do it (which I did for the Blue Dog I just posted) is to trace the different colors individually and assemble them with glue before transferring to the shoe. I printed out the blue dog, resized it a little, and traced the dark blue edge and glittered that, then carefully moved the printout to a fresh ziploc and traced and filled the interior portion in lighter blue, and did all the facial features individually (I had a ziploc with a bunch of little yellow eyes on it, very disconcerting). When everything was dry, I assembled and glued (for the border, you can just run a line of E6000 around the edge and fit the border piece along that...there's a lot of give in the 3D puff paint, even when dry). Tweezers can help with keeping the glue tidy during assembly (I try to pinch the piece on top on the glittered side so that I can dip in glue and just drop it into place). Hopefully that makes sense.
Nori, I've used this before to get finer lines from the paint bottles. Also works well with the glitter paint, which is what I use the most.
ReplyDeletehttp://www.favecrafts.com/Techniques/How-to-Fine-Tip-Glue-Bottle
This shoe is fabulous!
Awesome trick, I'll definitely try it! Thanks for sharing!
ReplyDelete