Very excited to share my first "vlog" post.
Watch me make a cake shoe start to finish here: Making Glittered Cake Shoes Video on YouTube
This covers the same material in the written Cake Shoes tutorial (which can be found here), but in video form (some steps are easier to understand if you watch them, and some people just pick things up more readily if they can see things in action vs. reading directions).
Would love to hear what y'all think!!
Thursday, October 22, 2015
Wednesday, September 16, 2015
Pictures from the September Workshop
Had an amazing time doing the Glittering 101 Workshops this past Saturday: we laughed, we glittered, everyone regardless of their experience level made gorgeous throws, and I put a pretty decent dent in the champagne-sherbet cocktails...Can't wait for the next one!!
For now, I will enjoy the memories by perusing some pictures (credit: Nicole Munchel Photography)


We all look super serious because we're focused on our throws...rest assured we were also having fun (at least I sure was; see above re: champagne-sherbet cocktails)!
Thursday, September 10, 2015
GIVEAWAY WINNER!
OK, hubby just ran the random number generator (using an R program that's apparently called "Frisbee Sailing"):

In case you don't speak computer, let me translate: the winner is TARA!!
Tara, since you're coming to the workshop (INJUSTTWODAYSOMGIMSOEXCITED), pick up will be easy - just make sure you've got plenty of trunk space and don't let me let you leave without your extra box of goodies!!
Thank you all so much for entering - it was awesome to hear from fellow shoe glitterers and I loved looking through your submissions for favorite Muses shoes. There's some spectacular stuff out there, very inspiring. I'm hoping to post a compilation here of pictures of everyone's favorites to refer back to when I'm looking for inspiration.
The next time I post here I will have run back-to-back workshops, so wish me luck! If you didn't get pulled off the wait list for September, I promise I'm doing my best to schedule something in December. Y'all are seriously pulling my heart strings with your emails :)
Sunday, August 30, 2015
GIVEAWAY - Shoe Pictures!
I'm so behind on posting, but wanted to update on the Giveaway. I may still do a few substitutions (I have a big bag of zebra striped shoes somewhere that I can't find, and I'm thinking one of those may make an appearance if I can put my hands on them before Sept. 12), but I've picked out all THIRTY shoes for the GIVEAWAY!
That's all of them! As a reminder, go and enter HERE by telling me about your favorite Muses Shoe by Sept. 9th and they might be yours to glitter!!
PS - You don't need to be a Muse to win, so tell your friends and they could potentially score more chances for you to get them...
 |
| Funky silhouetted shoes |
 |
| Super cool heeled shoes |
 |
| Boot-like shoes (the bottom one is what I used on the Aztec Goddess and looks great once it's all glittered, especially if you then trace and glitter all the cut outs) |
 |
| Perfect boots for getting (or maintaining) your boot balls |
 |
| Excellent wedges - these were living in my "turn these into more cake shoes" bin until I pulled them for the giveaway. The red one has lots of surface area for plenty of fake cake layers if you're feeling like taking a swing at a doberge or rainbow cake or something along those lines... |
 |
| Stripper-licious selections from my Ami Club Wear doorbusters order. We all know the more street-walker-y the better for Muses shoes - both have sky high heels and wicked platforms. |
 |
| Baby shoes (I'm counting these each as one-half) |
 |
| Some classic pointy toe high heels |
 |
| These are paired because they both have cool geometric heels - the top shoe has a really cone-like shoe (perfect for something like this) and the bottom shoe has a kind of faceted geology thing going. If you're someone who lets the shoes speak to you, I'm sure these would have plenty to say. |
 |
| Nice basic heels for classic Muses shoes. The bottom one is particularly nice because it's cream colored so you could layer iridescent sheers (or maybe get some sweet ombre going) without priming. |
 |
| I always grab shoes like this because I like to add stuff to the heels (snoballs, sno-blizes, coffee cups, gumball machines, cotton candy, etc.) and it's always easiest for sandal type heels. This one has pretty rhinestone trim along the front for extra fanciness. |
 |
| More Ami Club Wear gorgeousness - I'm including a rainbow pump and TWO pairs of the sequin heeled platforms (one pair of pale blue, one pair of yellow). I haven't glittered these yet, but I love how a bunch of the work is already done for you - those platforms are going to look sensational when they're glittered in coordinated colors to match the sequin patchwork on the heels. For the rainbow shoe, I might not glitter the exterior at all, which is a big deal for me...rarely do I see a shoe that wouldn't be majorly improved with glitter, but I'm thinking this is one of them. I might do a coat of plain white iridescent sheer glitter so the rainbow still shows through, trying to decide (can't wait to see what the Giveaway winner does with hers!!) |
 |
| Heels with a little something extra going one |
 |
| The top shoe is one of those heeled sandals I like for "sculptural shoes" where the heel is a cup/cone/etc. The bottom has all these cool holes that look really neat once the whole shoe is glittered (it was the mate for my Tabasco shoe) |
 |
| This kinda retro shoe - I don't usually like a strappy shoe because of the floppiness factor, but this one holds it's shape nicely and I love the chunky heel |
PS - You don't need to be a Muse to win, so tell your friends and they could potentially score more chances for you to get them...
Friday, August 14, 2015
I love you guys - GIVEAWAY
Not to get all gushy, but while I am always pretty psyched to have this blog, at times like this I'm double super especially grateful to have a space to swap tips and tricks with like-minded glitter enthusiasts!
First of all, I posted about the Ami Club Wear doorbusters sale and how the "catch" was expensive shipping, and a reader commented with this amazing hack: you can add a regular priced item to bring the total up to $50+ and still get free shipping and I tried it today and it WORKED. AMAZING!!! Thank you, Sarah Williamson: you are my favorite person. Let's ride a bicycle made out of dreams into friendship.
Secondly, I am absolutely over-the-moon excited about the September workshops. Yes, plural. So many people responded that I shifted the schedule around so I could offer two classes that day instead of one and fit twice as many ladies (yeah, I'm going to be dead by the end of the day, but what of it?) I cannot wait to meet all of you and glitter with you and its just going to be so amazing I can't wait!!! Lots of work to prep ahead of me, but I can tell it's going to so be worth it.
I'm feeling so full of love that I'm going to have a GIVEAWAY!!
Here's how it's going to work: between now and midnight of Wednesday September 9 comment here telling me about your favorite Muses shoe (a link/picture is helpful, but not essential) and why it was your favorite. Note that it does not have to be one of mine, I promise to be objective!! I'm going to pick my top 10 favorite entries and my husband (MIT degree in computer science) will use a random number generator to pick a winner.
The prize will be THIRTY SHOES - an entire year's ride's worth of shoes. Unglittered, but ready for you to unleash their Muse-y fantasticness. When my Ami Club Wear order arrives, I will post a picture of my 30 selections, but I will try to go as stripper-tastic as possible.
If you win, you (or some proxy you appoint) must be able to come pick the 30 shoes up during the September workshop hours, so some time between 12 and 6 pm on Saturday
So, start commenting here, share with Muses you know, and I'll update with a picture of the shoes in question as soon as possible.
Love and glitter, y'all.
Wednesday, August 12, 2015
Doorbusters Shoe Sale
This sale has been making the rounds (I've had three people send it to me so far - not complaining, please always send a shoe sale my way) and I just placed my order so I thought I'd share my thoughts: http://www.amiclubwear.com/door-busters.html
When you first see this your thoughts are going to be "OMG! $2 shoes!!" so before you get too excited, let me give you the good news and the bad news. The bad news: there's a catch and you aren't actually getting shoes for $2 a pair. The good news, they are still very cheap (cheapest I've ever seen for unused shoes) and some of them are positively stripper-licious.
The shipping is pretty pricey, that's the "catch." Yes, there's free shipping on orders $50 or more, but it doesn't apply for doorbusters.
As best I can tell, shipping for the first two pairs of shoes is about $12, then goes up about $2 for every pair of shoes you add. I'm not sure if this holds up, but works for a back of the envelope calculation:
For shoe price = $2 per shoe, number of shoes purchased = n
Total = (12 + 2n) + 2n = 12 + 4n
So, if the $2 extra shipping per shoe holds up you'd expect the price to asymptotically approach $4/pair.

So not actually $2/pair when all is said and done, BUT assuming you get more than 3 pairs, you're still looking at about $7/pair which is great for new shoes. My advice in terms of getting the most bang for your buck would just be to pick out really fabulous, unique pairs (I can get plain high heels at thrift stores for $2, so that's not what I'm hunting for here). Also, as always, if you have some float mates to pool orders with, you'll probably get a slight advantage there in total cost per shoe.
If you're curious, I ordered some of these yellow sequin platform heels:
And these fabulous rainbow gradient heels (which are $6.99 rather than $1.99, but still):
I'll post pictures when they arrive!
Also, while we're on the subject of shoe buying, I was visiting with a friend this past weekend who very generously let me pick through her finds and she had a trunk full of really great heels from Bloomin' Deals on Freret ($2.50/pair). This supports my theory that if you plan ahead and start buying shoes now you're probably going to have a much better selection than if you wait.
When you first see this your thoughts are going to be "OMG! $2 shoes!!" so before you get too excited, let me give you the good news and the bad news. The bad news: there's a catch and you aren't actually getting shoes for $2 a pair. The good news, they are still very cheap (cheapest I've ever seen for unused shoes) and some of them are positively stripper-licious.
The shipping is pretty pricey, that's the "catch." Yes, there's free shipping on orders $50 or more, but it doesn't apply for doorbusters.
As best I can tell, shipping for the first two pairs of shoes is about $12, then goes up about $2 for every pair of shoes you add. I'm not sure if this holds up, but works for a back of the envelope calculation:
For shoe price = $2 per shoe, number of shoes purchased = n
Total = (12 + 2n) + 2n = 12 + 4n
So, if the $2 extra shipping per shoe holds up you'd expect the price to asymptotically approach $4/pair.
So not actually $2/pair when all is said and done, BUT assuming you get more than 3 pairs, you're still looking at about $7/pair which is great for new shoes. My advice in terms of getting the most bang for your buck would just be to pick out really fabulous, unique pairs (I can get plain high heels at thrift stores for $2, so that's not what I'm hunting for here). Also, as always, if you have some float mates to pool orders with, you'll probably get a slight advantage there in total cost per shoe.
If you're curious, I ordered some of these yellow sequin platform heels:
 |
| Image from www.amiclubwear.com |
 |
| Image from www.amiclubwear.com |
Also, while we're on the subject of shoe buying, I was visiting with a friend this past weekend who very generously let me pick through her finds and she had a trunk full of really great heels from Bloomin' Deals on Freret ($2.50/pair). This supports my theory that if you plan ahead and start buying shoes now you're probably going to have a much better selection than if you wait.
Wednesday, August 5, 2015
September Workshop FULL!!
We are all full up for the September 12 workshop! I'm very excited - a great mix of experience levels and no less than three krewes represented! I can't wait for all the sparkly fun we're going to have :)
If you'd like to get on the wait list in case of a cancellation, email me at drnoripants at gmail dot com
If you'd like to get on the wait list in case of a cancellation, email me at drnoripants at gmail dot com
Tuesday, August 4, 2015
One last thing, and I'll let everyone get back to their regularly programmed Tuesday....
If you like my blog, and aren't reading Glitter Buzz NOLA yet, you should be - it's so, so good. Exquisite shoes, great ideas and lots of technical detail.
2016 Aztec Goddess Muses Shoe
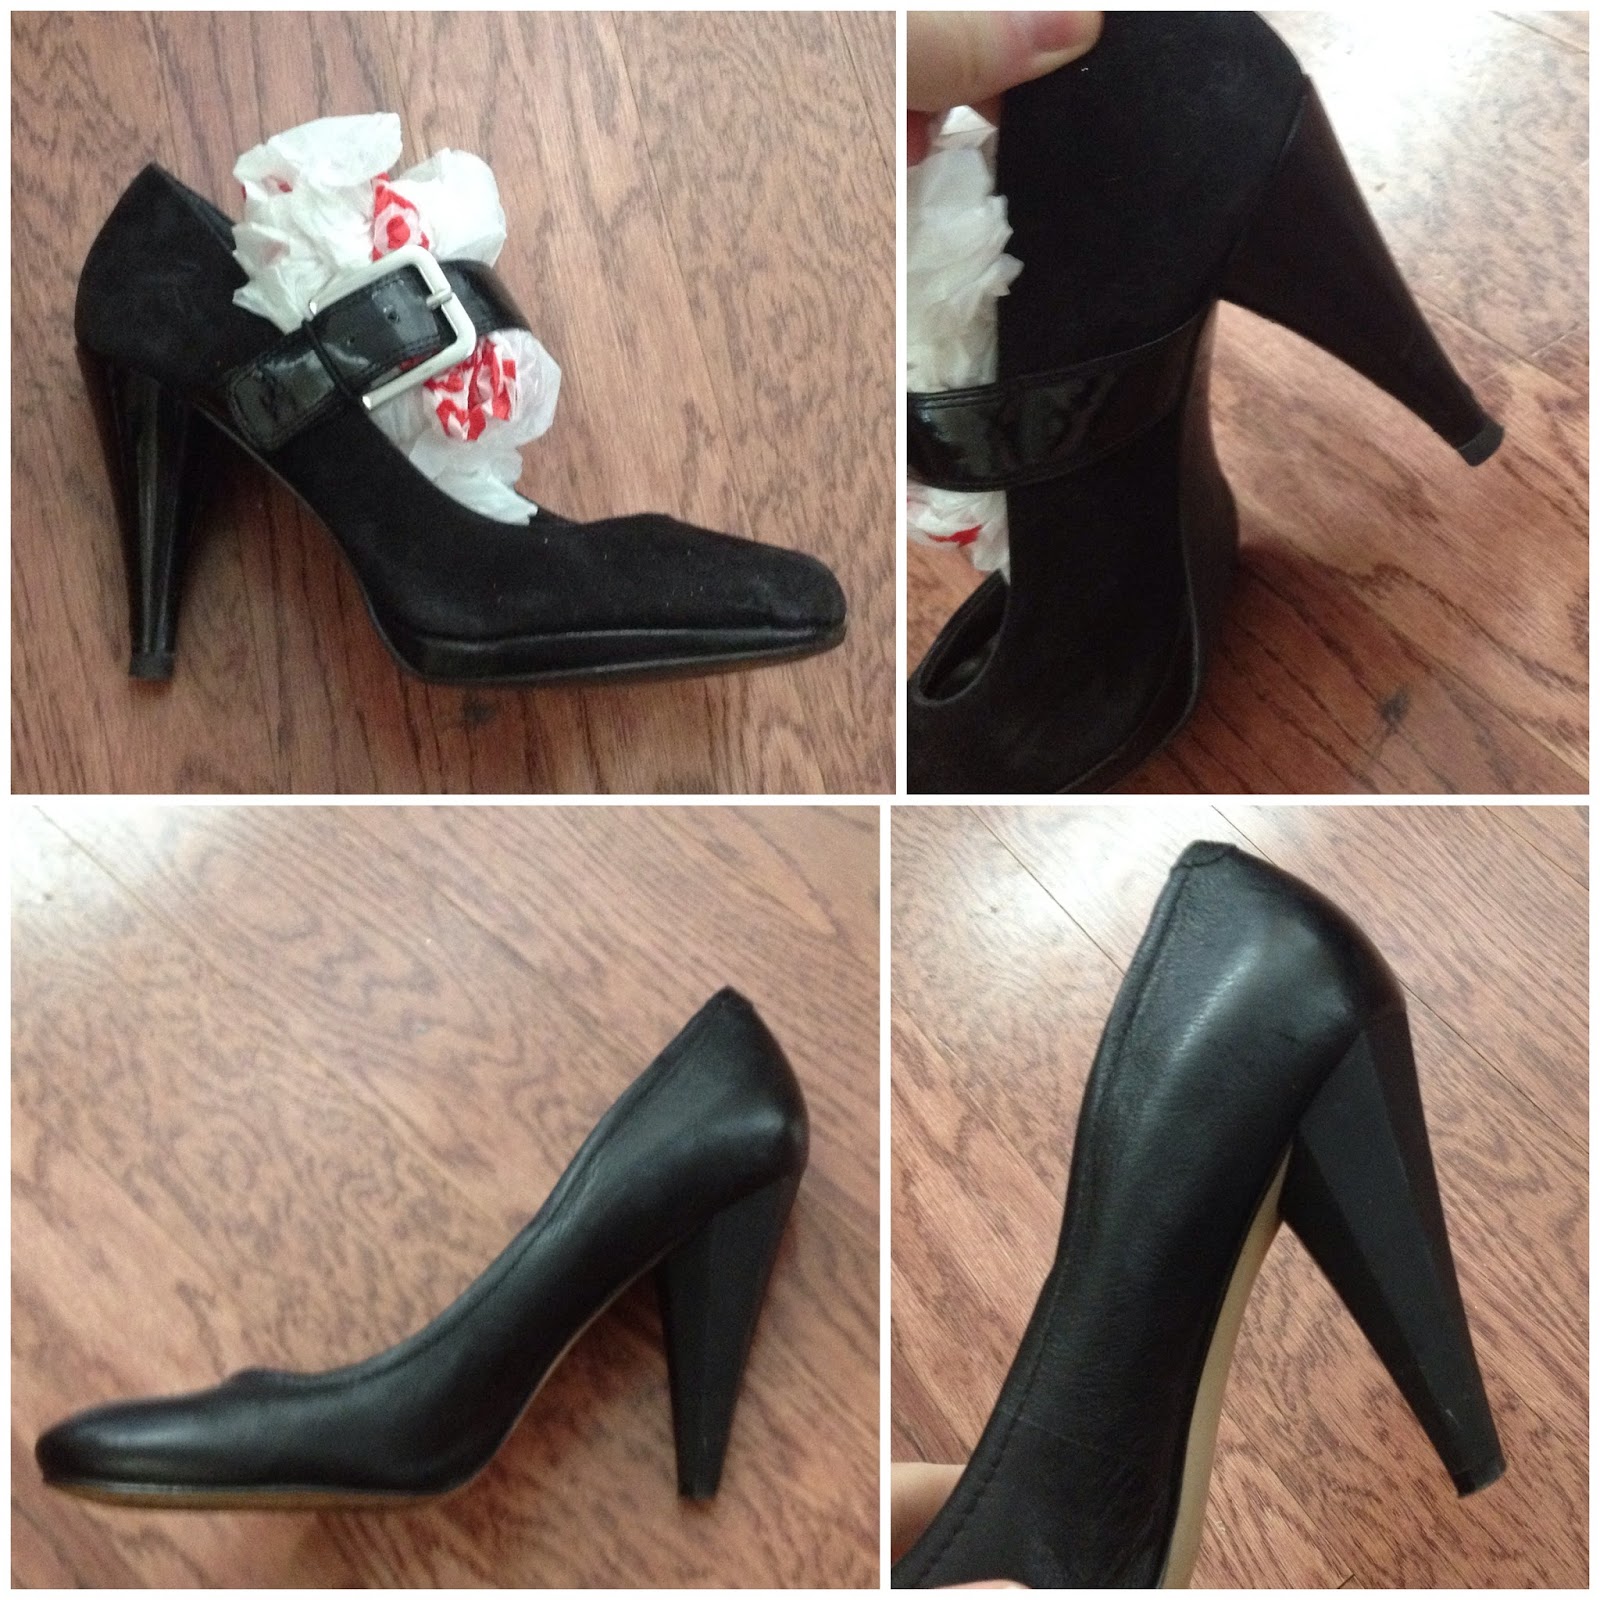
The shoe was a soft suede and super floppy, so I used it as a visual aid in my workshop for how to stiffen up or reshape a smushed shoe (which, FYI, I do by stuffing with plastic bags until the desired shape is obtained then coating with glue and letting it dry and only removing the plastic bags when the exterior is all glittered). I brought the unglittered shoe from the pair and this finished shoe so workshop participants could feel and see the difference. I will probably still throw this one (it says 2016), so I'll have to find another pair for the visual aid for future workshops.
I used Jefferson Variety glitter (blue on the exterior, green on the interior, holographic gold on the sole and zipper) and Gary's gold for tracing the cut outs and doing the glettering (JV is just a smidge coarser than all the other glitters I use and I thought the finer glitter would be better for detail work). I lined the edges with gold holographic faceted sequin trim from Papermart.com (my favorite source for sequin trim).
I finished it off with a big fan of dark green and peacock feathers and a little puff of green marabou. With the feathers and the color scheme, the final shoe has kind of an Aztec vibe, hence her name.


NOLA in 2 days + workshop update
So excited to be flying down to NOLA for a long weekend in 2 days! Normally my husband and I drive down and it's not a bad drive, but Southern Airways has added their Memphis - NOLA flights so we're seeing if the baby prefers a 2 hr flight on mama's lap to the 6 hrs in that torture device we call the car seat (spoiler alert: probably). If y'all don't know about Southern Airways, check them out - it's a tiny little 10-seat puddle jumper type plane that does a handful of flights to Southern cities and I love them. Obviously this and anything else I might mention here aren't pair endorsements...rest assured, my blog's too little to sell out.
Of course, I'll now totally contradict myself by plugging my September workshop! WE ARE HALF FULL FOR SEPTEMBER!! There may be another workshop before the 2016 ride (maybe December/early Jan), but I can't promise anything. Right now I'm considering having another 101, or I might have an "Advanced Embellishment" curriculum organized by then, or I might get blindsided by the holiday season/finishing shoes for my sister and I and just not get around to another workshop until after the 2016 Carnival season. Also, even if I have another in December, it's a super early Carnival this year and you'd be left with much less time to get your throws done for 2016 than if you sign up for September. So, I don't want to twist anyone's arm, but I'll just say if you're thinking you'd like to take my workshop, I wouldn't wait too much longer to drop me a line at drnoripants at gmail dot com. Spaces are, as the informercials would say, limited and going fast.
Anyways, can't wait for the weekend: Greenie Gals Preseason Tea, visit to Gary's to check out the new colors I've heard have been added, maybe even get crazy and pop into Jefferson Variety...
Friday, July 31, 2015
Glittering 101 Workshop - September 12, 2015
Exciting news!!! I have set a date for the next Glittering 101 Workshop!

We had so much fun at the last one, I absolutely cannot wait to spend time glittering with more of the creative ladies of Carnival!!!
The workshop will be 2.5 hrs long (2-4:30pm) on Saturday Sept. 12th. We're going to cover the basics of glittering shoes, including covering shoes with glitter, using the transfer technique for "glettering" (glittered lettering) and various types of embellishment. We'll cover the whole process start to finish, but I'll provide shoes at staggered stages of completeness so we don't have to wait for glue to dry between steps. At the end of the workshop, you'll leave with some partially completed shoes, at least one completely finished ready-to-throw shoe, and some extra materials for finishing up your partial shoes at your leisure. The workshop fee also includes a 23 page packet of useful write-ups (including a detailed step-by-step guide to glittering shoes with photos at each step, all the tips and tricks I've picked up in 5 years of shoe glittering, a guide of useful resources, etc.). Everything you need will be provided - you only need to sign up, pay up and show up!!
I originally assumed it would only be useful for beginners, but we had an even split last time (half total newbies, half really experienced glitterers) and everyone seemed to enjoy it. It's mostly geared towards shoes (which is where most of my experience is), but I did have a Nyx Goddess with us last time and a lot of the info transfers well to other handcrafted throws, so if you're in another krewe that rocks out hand made throws, you could certainly consider attending to. Basically, I don't want to give anyone the hard sell, I'm just saying I promise I won't chase anyone away...if you're interested, you're welcome regardless of your experience level, affiliation, skill set, etc.
Photos from the last workshop:
Feedback from the last workshop:
"The workshop was fantastic. I took away such great information and so appreciated the resource guides."
"We really enjoyed the workshop, it was fantastic...the write up was very helpful and has great detail."
"I think another awesome technique that you have is the transfer. I am not a good artist, but I feel like I can trace anything, so thank you :)" (PS- I saw her very first finished shoe, she most certainly is a good artist!!)
"I LOVED the workshop! As a first time rider, I was at a loss as to where to begin to make beautiful shoes, and it is very important to me to create shoes worthy of the krewe. From the pictures I saw online of your gorgeous and creative shoes, I knew you had put in the sweat and tears of figuring out the best processes. So instead of reinventing the wheel, I thought why not ask you to teach us? Your guidance and mad skills have given me the foundation I was looking for. I can't wait to get started on my own originals to hand out in 2016!"
If you're interested or have any questions, drop me an email at drnoripants at gmail dot com and I can give you more info (including pricing)!! YAY GLITTER!!

We had so much fun at the last one, I absolutely cannot wait to spend time glittering with more of the creative ladies of Carnival!!!
The workshop will be 2.5 hrs long (2-4:30pm) on Saturday Sept. 12th. We're going to cover the basics of glittering shoes, including covering shoes with glitter, using the transfer technique for "glettering" (glittered lettering) and various types of embellishment. We'll cover the whole process start to finish, but I'll provide shoes at staggered stages of completeness so we don't have to wait for glue to dry between steps. At the end of the workshop, you'll leave with some partially completed shoes, at least one completely finished ready-to-throw shoe, and some extra materials for finishing up your partial shoes at your leisure. The workshop fee also includes a 23 page packet of useful write-ups (including a detailed step-by-step guide to glittering shoes with photos at each step, all the tips and tricks I've picked up in 5 years of shoe glittering, a guide of useful resources, etc.). Everything you need will be provided - you only need to sign up, pay up and show up!!
I originally assumed it would only be useful for beginners, but we had an even split last time (half total newbies, half really experienced glitterers) and everyone seemed to enjoy it. It's mostly geared towards shoes (which is where most of my experience is), but I did have a Nyx Goddess with us last time and a lot of the info transfers well to other handcrafted throws, so if you're in another krewe that rocks out hand made throws, you could certainly consider attending to. Basically, I don't want to give anyone the hard sell, I'm just saying I promise I won't chase anyone away...if you're interested, you're welcome regardless of your experience level, affiliation, skill set, etc.
Photos from the last workshop:
 |
| Boy, were they ever!! |
 |
| Shoes at different stages of completion let us work through the entire process start to finish |
 |
| How I pretty much like to be whenever possible- wearing my black glittering gloves and holding a Mardi Gras cup full of wine in one hand while I glitter shoes with the other. Does it get better? |
 |
| Everything I know about shoe glittering organized in one handy folder |
 |
| A participant's finished shoe at the end of the workshop - her first shoe ever! |
Feedback from the last workshop:
"The workshop was fantastic. I took away such great information and so appreciated the resource guides."
"We really enjoyed the workshop, it was fantastic...the write up was very helpful and has great detail."
"I think another awesome technique that you have is the transfer. I am not a good artist, but I feel like I can trace anything, so thank you :)" (PS- I saw her very first finished shoe, she most certainly is a good artist!!)
"I LOVED the workshop! As a first time rider, I was at a loss as to where to begin to make beautiful shoes, and it is very important to me to create shoes worthy of the krewe. From the pictures I saw online of your gorgeous and creative shoes, I knew you had put in the sweat and tears of figuring out the best processes. So instead of reinventing the wheel, I thought why not ask you to teach us? Your guidance and mad skills have given me the foundation I was looking for. I can't wait to get started on my own originals to hand out in 2016!"
If you're interested or have any questions, drop me an email at drnoripants at gmail dot com and I can give you more info (including pricing)!! YAY GLITTER!!
Saturday, July 25, 2015
Finished Lisa Frank Shoe (plus tips and tricks for ombre, leopard spots and decorating with confetti)
After seeing all the 90s-tastic graphic design for the Nola Mom's Blog 90s Prom Mom's Night Out, I was inspired to do a Lisa Frank flavored shoe. I was a pretty typical 90s girl in my coveting Lisa Frank school supplies: cute animals, psychedelic night skies and everything RAINBOW all the time always.
This was also a good opportunity for me to play with some new decorating techniques: ombre (which has been rattling around in my head for a while) and free handing animal print (I've traced cheetah print before, but wanted more practice flying without a safety net).
The "trick" to an ombre (besides having an absurd variety of glitter in your stash #sorrynotsorry) is understanding that only iridescent/sheer glitters blend...opaque glitters will of course mix (they won't separate or anything) and you can get some really dazzling effects by combining them (stay tuned - more on that in a later post), but the color isn't going to look like a blend between the two starting hues. For that, you need to be using iridescent/sheer glitter. After doing a couple of custom blends, I also advise that you work with reasonably close colors for a blend: green + blue will give you a nice teal (see the Tiffany Box shoe), or a pale pastel iridescent + white will give you an even paler pastel (which is what I've been using for Birthday Cake shoes), but if you mix white with a really bright or dark color, even another iridescent sheer, it just isn't going to blend as nicely.
So, first up I picked out my base "rainbow," which for me was Recollections "fairy dust," Gary's glitter by the pound sheer pink, then Gary's orange, then Gary's yellow, then Martha Stewart "limeade," then ArtMinds stackable sheer teal, then finally Martha Stewart "blueberry slush." All the Martha Stewart glitters in there are found in the iridescent 12 pack and you could make a very nice rainbow just from those colors, but whenever I had anything else that would work I used it instead as MS iridescent is pretty pricey (I find Gary's yellow iridescent glitter to be indistinguishable from Martha Stewart "lemon drop" and it's an eight of the price by the ounce). There are a lot of other sheers that would work in a rainbow (I have some nice neons from ArtMinds that I think will make a really nice retina-scorcher of an ombre), so I'd encourage you to use what you have in your stash. Also bear in mind you don't have to do a full rainbow (though for Lisa Frank, it's nice).
So after I picked out my colors, I transferred a bit to lidded 2 oz Jello Shot cups (not strictly speaking necessary, but I was running low on a few and didn't want to accidentally use it all up in blends and not have enough left of the original for my rainbow). For each color transition (i.e., purple to pink, pink to orange, orange to yellow, etc.), I shook out approx. half of each color into a 2 oz cup and shook to mix. Now I had a bunch of little cups spanning a reasonably smoothly transitioning rainbow. If you're working with fewer colors and some of the transitions are a little jarring, you may want to consider having some additional transition blends besides half and half (for example: purple, then 2/3rd purple + 1/3rd pink, then 1/2 purple + 1/2 pink, then 1/3 purple + 2/3 pink, then pink).
Because your glitter is sheer, your shoe needs to be white for this to work. I used a primed a basic pump with white spray paint. I have some white shoes in my stash, but not enough so I do a fair amount of priming. I added Mod Podge to my primed white shoe and carefully shook the colors on in stripes one at a time. Be careful when you pour off the excess glitter that you don't pour onto wet glue (pay attention to the direction of your pouring basically). If you're nervous, you could do it a few colors at a time, it's not a one shot deal like some other techniques. I would say two layers are recommended for opaque glitters, and essential for iridescents: I just don't get the same depth and intensity of color out of an iridescent sheer unless you do two (and maybe even three) coats, even if you've primed in white. You might get away with it if you've primed in a really similar colored spray paint, or if you've used the trick of putting a similarly-hued opaque layer down before your iridescent, but I generally do at least two layers. So after the first layer of glitter dried, I did another pass of glue and rainbow stripes to intensify the colors. The added bonus effect of this second layer is, because you don't exactly perfectly trace the stripes you laid down the first time (even if you wanted to you couldn't), another layer helps make the blend from color to color more...blendy, so to speak. When the glue dries, the first layer will show through a bit, so you don't want to stray too too much from your initial stripes, but a little blurring of the edges is great for the final effect.
Here's my shoe after the base of sheer iridescent rainbow ombre was done:
You can see not all the transitions are perfectly seamless (the yellow is a little more abrupt than I'd like), and if this was all the shoe was going to be I might think about adding a third layer to try and smooth them out a little. But it doesn't need to be perfect because the cheetah print that's going over it will obfuscate imperfections.
The reference images also give you an idea how the black spot borders should look: roughly circular blobs forming a vaguely oval ring that's open in a few spots. I free handed these with Tulip Scribbles and Martha Stewart onyx. Here are a some shots of the finished spot outlines:


After the spot outlines were done, the last step (other than glettering and glittering the rest of the shoe of course) was to fill in the spots. Using the "fill the spots in a shade slightly darker than the background" rule I picked out a corresponding rainbow of Martha Stewart opaque jewel tones:
These are a combo of selections from the "Essential Glitter Set" and "Rich Essential Glitter Set" 24 packs (see here), but I'm sure you could make do with one or the other, especially if you had other opaque glitters in your stash.
If you're curious, here are the exact details of how the jewel tone rainbow for the spot centers aligned with the background iridescent glitters (including blends) from toe to heel:
Using a crystal Tulip Scribbles, I carefully filled in the spots and added the corresponding opaque jewel tone glitters:

And here's the finished exterior with all the spots filled in:


Phew!! A grand total of 23 different shades of glitter in, and you haven't even tackled the interior, sole, heel, platform or glettering! But you're starting to get that awesome 90s vibe, right?

For the rest of the shoe, I was picturing a Lisa Frank style night sky. I blended some dark blue Jefferson Variety glitter with Martha Stewart iridescent "licorice" glitter and glittered all the other surfaces of the shoe. I used silver trim to pick up on the metallic star and moon sequins I added to may the night sky background.
For the glettering, I used the jewel tone opaque glitter rainbow to make ombre lettering (I didn't try to do the colors one at a time, I just shook out a teeny bit of each and lost a smidge).

A word to the wise: skip whichever color is too close to your background colors (I should've started with pink and ended on green) because it won't show up as clearly once you transfer
Finally, I added silver moons and golden stars all over the dark blue background, including the bottom of the shoe (no, it's not practical...what are you, new here?)
Side bar - note that you can use metallic confetti just like you'd use sequins (i.e. as a cool little accent on your shoe) and they come in better shapes (sequins are pretty much mostly just round). I have bought many many little packets of metallic awesomeness from Chico Party, including the night sky sequins I used here. They have a huge selection - prepare to get lost in that website imagining all the cool shoes/purses you could do. Just now, when I looked up the URL to link to, I saw these guys and my mind started to wander to a Jurassic Park shoe we were just talking about on Facebook....and ooh, these dolphins would be awesome on another Lisa Frank shoe and...wait...what were we talking about? *Cough.* Anyway, I use E6000 to attach them to the shoe, using a toothpick to both put a teeny dollop and pick up individual sequins and move them to the shoe.
Here are lots of pics of the finished shoe:


Ready to go to its new home in just a little under 200 days!!! I'm going to try a few more ombres and will, as always, share any and everything about it here in excruciating detail. Have a great weekend!!
This was also a good opportunity for me to play with some new decorating techniques: ombre (which has been rattling around in my head for a while) and free handing animal print (I've traced cheetah print before, but wanted more practice flying without a safety net).
The "trick" to an ombre (besides having an absurd variety of glitter in your stash #sorrynotsorry) is understanding that only iridescent/sheer glitters blend...opaque glitters will of course mix (they won't separate or anything) and you can get some really dazzling effects by combining them (stay tuned - more on that in a later post), but the color isn't going to look like a blend between the two starting hues. For that, you need to be using iridescent/sheer glitter. After doing a couple of custom blends, I also advise that you work with reasonably close colors for a blend: green + blue will give you a nice teal (see the Tiffany Box shoe), or a pale pastel iridescent + white will give you an even paler pastel (which is what I've been using for Birthday Cake shoes), but if you mix white with a really bright or dark color, even another iridescent sheer, it just isn't going to blend as nicely.
So, first up I picked out my base "rainbow," which for me was Recollections "fairy dust," Gary's glitter by the pound sheer pink, then Gary's orange, then Gary's yellow, then Martha Stewart "limeade," then ArtMinds stackable sheer teal, then finally Martha Stewart "blueberry slush." All the Martha Stewart glitters in there are found in the iridescent 12 pack and you could make a very nice rainbow just from those colors, but whenever I had anything else that would work I used it instead as MS iridescent is pretty pricey (I find Gary's yellow iridescent glitter to be indistinguishable from Martha Stewart "lemon drop" and it's an eight of the price by the ounce). There are a lot of other sheers that would work in a rainbow (I have some nice neons from ArtMinds that I think will make a really nice retina-scorcher of an ombre), so I'd encourage you to use what you have in your stash. Also bear in mind you don't have to do a full rainbow (though for Lisa Frank, it's nice).
So after I picked out my colors, I transferred a bit to lidded 2 oz Jello Shot cups (not strictly speaking necessary, but I was running low on a few and didn't want to accidentally use it all up in blends and not have enough left of the original for my rainbow). For each color transition (i.e., purple to pink, pink to orange, orange to yellow, etc.), I shook out approx. half of each color into a 2 oz cup and shook to mix. Now I had a bunch of little cups spanning a reasonably smoothly transitioning rainbow. If you're working with fewer colors and some of the transitions are a little jarring, you may want to consider having some additional transition blends besides half and half (for example: purple, then 2/3rd purple + 1/3rd pink, then 1/2 purple + 1/2 pink, then 1/3 purple + 2/3 pink, then pink).
Because your glitter is sheer, your shoe needs to be white for this to work. I used a primed a basic pump with white spray paint. I have some white shoes in my stash, but not enough so I do a fair amount of priming. I added Mod Podge to my primed white shoe and carefully shook the colors on in stripes one at a time. Be careful when you pour off the excess glitter that you don't pour onto wet glue (pay attention to the direction of your pouring basically). If you're nervous, you could do it a few colors at a time, it's not a one shot deal like some other techniques. I would say two layers are recommended for opaque glitters, and essential for iridescents: I just don't get the same depth and intensity of color out of an iridescent sheer unless you do two (and maybe even three) coats, even if you've primed in white. You might get away with it if you've primed in a really similar colored spray paint, or if you've used the trick of putting a similarly-hued opaque layer down before your iridescent, but I generally do at least two layers. So after the first layer of glitter dried, I did another pass of glue and rainbow stripes to intensify the colors. The added bonus effect of this second layer is, because you don't exactly perfectly trace the stripes you laid down the first time (even if you wanted to you couldn't), another layer helps make the blend from color to color more...blendy, so to speak. When the glue dries, the first layer will show through a bit, so you don't want to stray too too much from your initial stripes, but a little blurring of the edges is great for the final effect.
Here's my shoe after the base of sheer iridescent rainbow ombre was done:
 |
| A little blurry, sorry about that. |
Step 2 - leopard print time! My "formula" for leopard print is: pale background color + black spot outlines + darker shade of the background color inside the spot outlines. This works for doing both natural and the, shall we say, not-exactly-found-in-nature leopard prints:
 |
| A few examples of different leopard prints (for a "naturalistic" leopard I would recommend Recollections champagne or Martha Stewart "smoky topaz" for the background and a copper glitter for inside the spots) |
And, as you can see in this reference image, it's also the Lisa Frank approach to rainbow leopards:
 |
| Lisa Frank Hunter the Leopard Cub notecard. That etsy seller has a ton of Lisa Frank if you're feeling nostalgic. |
The reference images also give you an idea how the black spot borders should look: roughly circular blobs forming a vaguely oval ring that's open in a few spots. I free handed these with Tulip Scribbles and Martha Stewart onyx. Here are a some shots of the finished spot outlines:


After the spot outlines were done, the last step (other than glettering and glittering the rest of the shoe of course) was to fill in the spots. Using the "fill the spots in a shade slightly darker than the background" rule I picked out a corresponding rainbow of Martha Stewart opaque jewel tones:
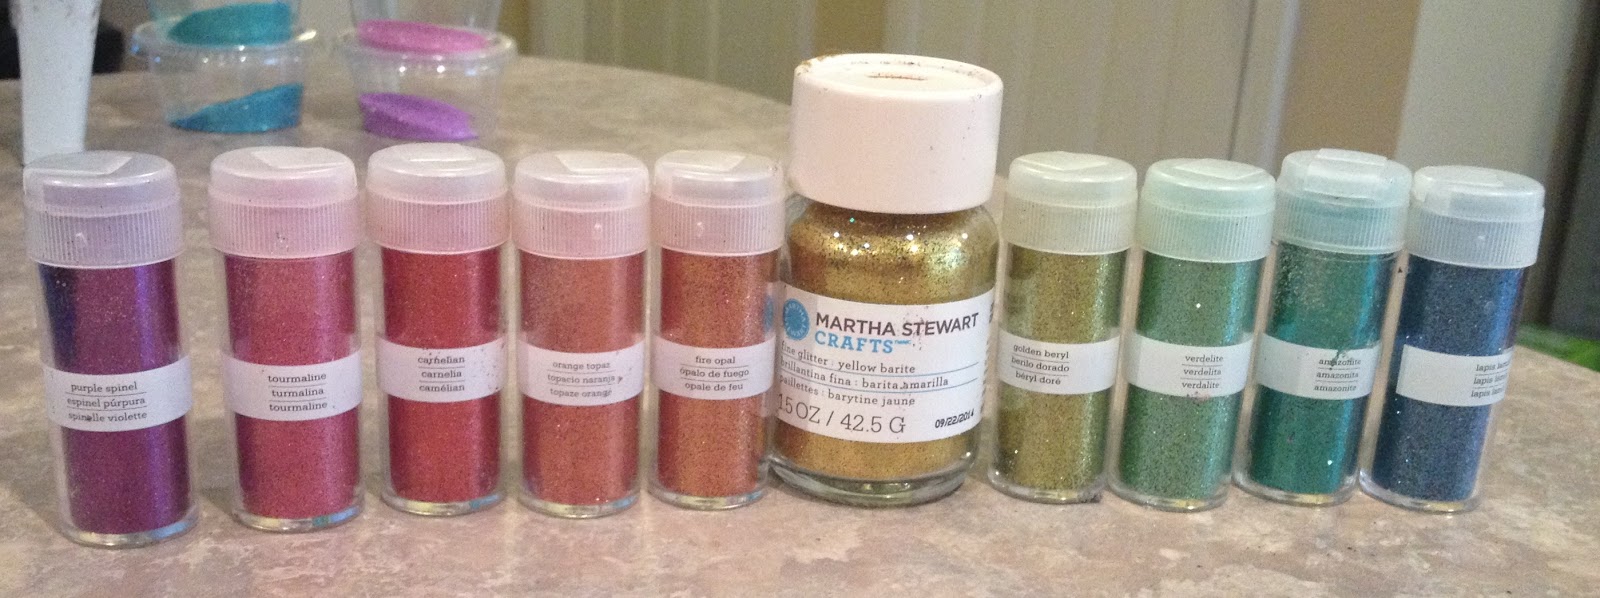 |
| Jewel tone rainbow: purple spinel, tourmaline, carnelian, orange topaz, fire opal, yellow barite, golden beryl, verdelite, amazonite, lapis lazuli |
These are a combo of selections from the "Essential Glitter Set" and "Rich Essential Glitter Set" 24 packs (see here), but I'm sure you could make do with one or the other, especially if you had other opaque glitters in your stash.
If you're curious, here are the exact details of how the jewel tone rainbow for the spot centers aligned with the background iridescent glitters (including blends) from toe to heel:
 |
| Recollections "fairy dust" paired with "purple spinel." The pink + purple transition blend paired with "tourmaline." Gary's pink paired with "carnelian." The pink + orange blend paired with "orange topaz" |
 |
| Gary's orange glitter also paired with "orange topaz." Orange + yellow blend paired with "fire opal." Gary's yellow glitter paired with "yellow barite." Yellow + green blend paired with "golden beryl" |
 |
| Martha "limeade" also paired with "golden beryl." ArtMinds teal paired with "verdelite." Teal + blue blend paired with "amazonite." Martha Stewart "blueberry slush" paired with lapis lazuli |
Using a crystal Tulip Scribbles, I carefully filled in the spots and added the corresponding opaque jewel tone glitters:

And here's the finished exterior with all the spots filled in:


Phew!! A grand total of 23 different shades of glitter in, and you haven't even tackled the interior, sole, heel, platform or glettering! But you're starting to get that awesome 90s vibe, right?

For the rest of the shoe, I was picturing a Lisa Frank style night sky. I blended some dark blue Jefferson Variety glitter with Martha Stewart iridescent "licorice" glitter and glittered all the other surfaces of the shoe. I used silver trim to pick up on the metallic star and moon sequins I added to may the night sky background.
For the glettering, I used the jewel tone opaque glitter rainbow to make ombre lettering (I didn't try to do the colors one at a time, I just shook out a teeny bit of each and lost a smidge).

A word to the wise: skip whichever color is too close to your background colors (I should've started with pink and ended on green) because it won't show up as clearly once you transfer
 |
| Glettering transferred |
Side bar - note that you can use metallic confetti just like you'd use sequins (i.e. as a cool little accent on your shoe) and they come in better shapes (sequins are pretty much mostly just round). I have bought many many little packets of metallic awesomeness from Chico Party, including the night sky sequins I used here. They have a huge selection - prepare to get lost in that website imagining all the cool shoes/purses you could do. Just now, when I looked up the URL to link to, I saw these guys and my mind started to wander to a Jurassic Park shoe we were just talking about on Facebook....and ooh, these dolphins would be awesome on another Lisa Frank shoe and...wait...what were we talking about? *Cough.* Anyway, I use E6000 to attach them to the shoe, using a toothpick to both put a teeny dollop and pick up individual sequins and move them to the shoe.
Here are lots of pics of the finished shoe:


Ready to go to its new home in just a little under 200 days!!! I'm going to try a few more ombres and will, as always, share any and everything about it here in excruciating detail. Have a great weekend!!
Subscribe to:
Posts (Atom)