Friday, July 31, 2015

Glittering 101 Workshop - September 12, 2015

Exciting news!!! I have set a date for the next Glittering 101 Workshop!


We had so much fun at the last one, I absolutely cannot wait to spend time glittering with more of the creative ladies of Carnival!!!

The workshop will be 2.5 hrs long (2-4:30pm) on Saturday Sept. 12th. We're going to cover the basics of glittering shoes, including covering shoes with glitter, using the transfer technique for "glettering" (glittered lettering) and various types of embellishment. We'll cover the whole process start to finish, but I'll provide shoes at staggered stages of completeness so we don't have to wait for glue to dry between steps. At the end of the workshop, you'll leave with some partially completed shoes, at least one completely finished ready-to-throw shoe, and some extra materials for finishing up your partial shoes at your leisure. The workshop fee also includes a 23 page packet of useful write-ups (including a detailed step-by-step guide to glittering shoes with photos at each step, all the tips and tricks I've picked up in 5 years of shoe glittering, a guide of useful resources, etc.). Everything you need will be provided - you only need to sign up, pay up and show up!!

I originally assumed it would only be useful for beginners, but we had an even split last time (half total newbies, half really experienced glitterers) and everyone seemed to enjoy it. It's  mostly geared towards shoes (which is where most of my experience is), but I did have a Nyx Goddess with us last time and a lot of the info transfers well to other handcrafted throws, so if you're in another krewe that rocks out hand made throws, you could certainly consider attending to. Basically, I don't want to give anyone the hard sell, I'm just saying I promise I won't chase anyone away...if you're interested, you're welcome regardless of your experience level, affiliation, skill set, etc.

Photos from the last workshop:


Boy, were they ever!! 
Shoes at different stages of completion let us work through the entire process start to finish
How I pretty much like to be whenever possible- wearing my black glittering gloves and holding a Mardi Gras cup full of wine in one hand while I glitter shoes with the other. Does it get better?
Everything I know about shoe glittering organized in one handy folder
A participant's finished shoe at the end of the workshop - her first shoe ever!

Feedback from the last workshop:

"The workshop was fantastic. I took away such great information and so appreciated the resource guides."

"We really enjoyed the workshop, it was fantastic...the write up was very helpful and has great detail."

"I think another awesome technique that you have is the transfer. I am not a good artist, but I feel like I can trace anything, so thank you :)" (PS- I saw her very first finished shoe, she most certainly is a good artist!!)

"I LOVED the workshop! As a first time rider, I was at a loss as to where to begin to make beautiful shoes, and it is very important to me to create shoes worthy of the krewe. From the pictures I saw online of your gorgeous and creative shoes, I knew you had put in the sweat and tears of figuring out the best processes. So instead of reinventing the wheel, I thought why not ask you to teach us? Your guidance and mad skills have given me the foundation I was looking for. I can't wait to get started on my own originals to hand out in 2016!"

If you're interested or have any questions, drop me an email at drnoripants at gmail dot com and I can give you more info (including pricing)!! YAY GLITTER!!

Saturday, July 25, 2015

Finished Lisa Frank Shoe (plus tips and tricks for ombre, leopard spots and decorating with confetti)

After seeing all the 90s-tastic graphic design for the Nola Mom's Blog 90s Prom Mom's Night Out, I was inspired to do a Lisa Frank flavored shoe. I was a pretty typical 90s girl in my coveting Lisa Frank school supplies: cute animals, psychedelic night skies and everything RAINBOW all the time always.

This was also a good opportunity for me to play with some new decorating techniques: ombre (which has been rattling around in my head for a while) and free handing animal print (I've traced cheetah print before, but wanted more practice flying without a safety net).

The "trick" to an ombre (besides having an absurd variety of glitter in your stash #sorrynotsorry) is understanding that only iridescent/sheer glitters blend...opaque glitters will of course mix (they won't separate or anything) and you can get some really dazzling effects by combining them (stay tuned - more on that in a later post), but the color isn't going to look like a blend between the two starting hues. For that, you need to be using iridescent/sheer glitter. After doing a couple of custom blends, I also advise that you work with reasonably close colors for a blend: green + blue will give you a nice teal (see the Tiffany Box shoe), or a pale pastel iridescent + white will give you an even paler pastel (which is what I've been using for Birthday Cake shoes), but if you mix white with a really bright or dark color, even another iridescent sheer, it just isn't going to blend as nicely.

So, first up I picked out my base "rainbow," which for me was Recollections "fairy dust," Gary's glitter by the pound sheer pink, then Gary's orange, then Gary's yellow, then Martha Stewart "limeade," then ArtMinds stackable sheer teal, then finally Martha Stewart "blueberry slush." All the Martha Stewart glitters in there are found in the iridescent 12 pack and you could make a very nice rainbow just from those colors, but whenever I had anything else that would work I used it instead as MS iridescent is pretty pricey (I find Gary's yellow iridescent glitter to be indistinguishable from Martha Stewart "lemon drop" and it's an eight of the price by the ounce). There are a lot of other sheers that would work in a rainbow (I have some nice neons from ArtMinds that I think will make a really nice retina-scorcher of an ombre), so I'd encourage you to use what you have in your stash. Also bear in mind you don't have to do a full rainbow (though for Lisa Frank, it's nice).

So after I picked out my colors, I transferred a bit to lidded 2 oz Jello Shot cups (not strictly speaking necessary, but I was running low on a few and didn't want to accidentally use it all up in blends and not have enough left of the original for my rainbow). For each color transition (i.e., purple to pink, pink to orange, orange to yellow, etc.), I shook out approx. half of each color into a 2 oz cup and shook to mix. Now I had a bunch of little cups spanning a reasonably smoothly transitioning rainbow. If you're working with fewer colors and some of the transitions are a little jarring, you may want to consider having some additional transition blends besides half and half (for example: purple, then 2/3rd purple + 1/3rd pink, then 1/2 purple + 1/2 pink, then 1/3 purple + 2/3 pink, then pink).

Because your glitter is sheer, your shoe needs to be white for this to work. I used a primed a basic pump with white spray paint. I have some white shoes in my stash, but not enough so I do a fair amount of priming. I added Mod Podge to my primed white shoe and carefully shook the colors on in stripes one at a time. Be careful when you pour off the excess glitter that you don't pour onto wet glue (pay attention to the direction of your pouring basically). If you're nervous, you could do it a few colors at a time, it's not a one shot deal like some other techniques. I would say two layers are recommended for opaque glitters, and essential for iridescents: I just don't get the same depth and intensity of color out of an iridescent sheer unless you do two (and maybe even three) coats, even if you've primed in white. You might get away with it if you've primed in a really similar colored spray paint, or if you've used the trick of putting a similarly-hued opaque layer down before your iridescent, but I generally do at least two layers. So after the first layer of glitter dried, I did another pass of glue and rainbow stripes to intensify the colors. The added bonus effect of this second layer is, because you don't exactly perfectly trace the stripes you laid down the first time (even if you wanted to you couldn't), another layer helps make the blend from color to color more...blendy, so to speak. When the glue dries, the first layer will show through a bit, so you don't want to stray too too much from your initial stripes, but a little blurring of the edges is great for the final effect.

Here's my shoe after the base of sheer iridescent rainbow ombre was done:
A little blurry, sorry about that.
You can see not all the transitions are perfectly seamless (the yellow is a little more abrupt than I'd like), and if this was all the shoe was going to be I might think about adding a third layer to try and smooth them out a little. But it doesn't need to be perfect because the cheetah print that's going over it will obfuscate imperfections.

Step 2 - leopard print time! My "formula" for leopard print is: pale background color + black spot outlines + darker shade of the background color inside the spot outlines. This works for doing both natural and the, shall we say, not-exactly-found-in-nature leopard prints:

A few examples of different leopard prints (for a "naturalistic" leopard I would recommend Recollections champagne or Martha Stewart "smoky topaz" for the background and a copper glitter for inside the spots)
And, as you can see in this reference image, it's also the Lisa Frank approach to rainbow leopards:
Lisa Frank Hunter the Leopard Cub notecard. That etsy seller has a ton of Lisa Frank if you're feeling nostalgic.

The reference images also give you an idea how the black spot borders should look: roughly circular blobs forming a vaguely oval ring that's open in a few spots. I free handed these with Tulip Scribbles and Martha Stewart onyx. Here are a some shots of the finished spot outlines:


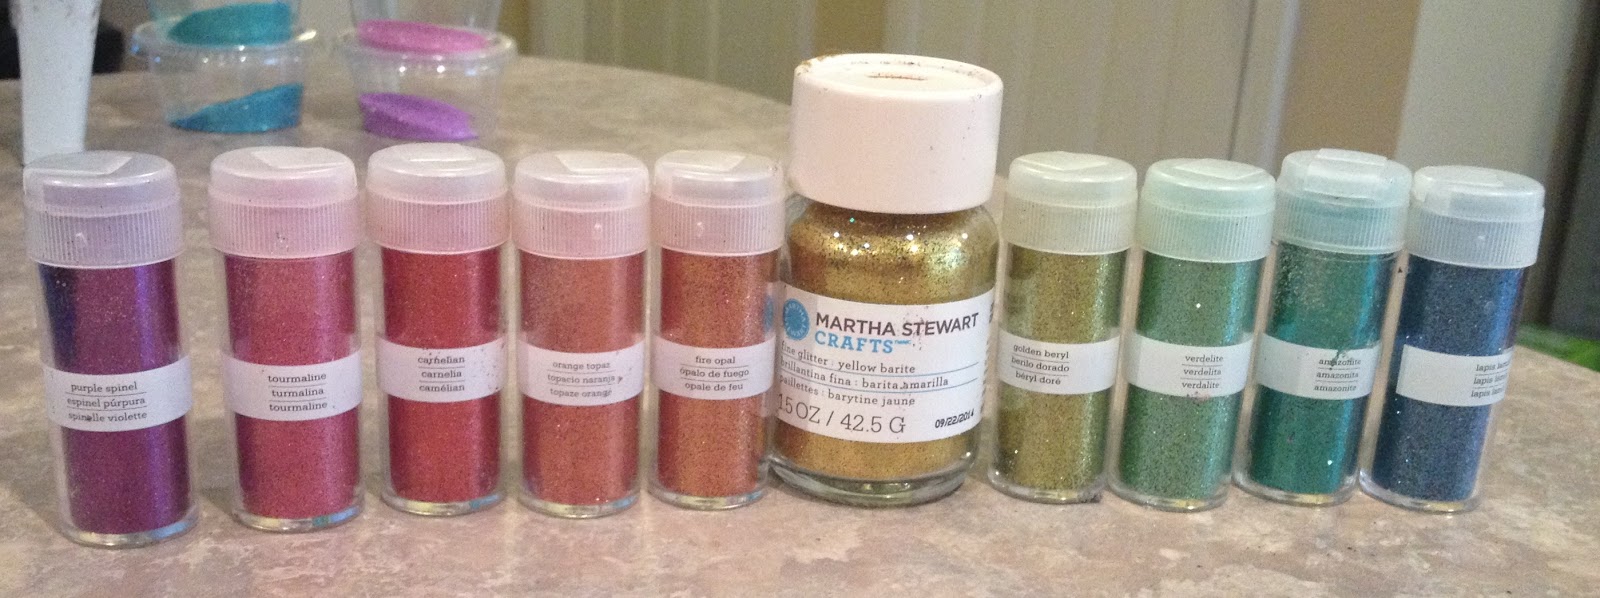
After the spot outlines were done, the last step (other than glettering and glittering the rest of the shoe of course) was to fill in the spots. Using the "fill the spots in a shade slightly darker than the background" rule I picked out a corresponding rainbow of Martha Stewart opaque jewel tones:

Jewel tone rainbow: purple spinel, tourmaline, carnelian, orange topaz, fire opal, yellow barite, golden beryl, verdelite, amazonite, lapis lazuli

These are a combo of selections from the "Essential Glitter Set" and "Rich Essential Glitter Set" 24 packs (see here), but I'm sure you could make do with one or the other, especially if you had other opaque glitters in your stash.

If you're curious, here are the exact details of how the jewel tone rainbow for the spot centers aligned with the background iridescent glitters (including blends) from toe to heel:

Recollections "fairy dust" paired with "purple spinel." The pink + purple transition blend paired with "tourmaline." Gary's pink paired with "carnelian." The pink + orange blend paired with "orange topaz"

Gary's orange glitter also paired with "orange topaz." Orange + yellow blend paired with "fire opal." Gary's yellow glitter paired with "yellow barite." Yellow + green blend paired with "golden beryl"

Martha "limeade" also paired with "golden beryl." ArtMinds teal paired with "verdelite." Teal + blue blend paired with "amazonite." Martha Stewart "blueberry slush" paired with lapis lazuli

Using a crystal Tulip Scribbles, I carefully filled in the spots and added the corresponding opaque jewel tone glitters:


And here's the finished exterior with all the spots filled in:


Phew!! A grand total of 23 different shades of glitter in, and you haven't even tackled the interior, sole, heel, platform or glettering! But you're starting to get that awesome 90s vibe, right?


For the rest of the shoe, I was picturing a Lisa Frank style night sky. I blended some dark blue Jefferson Variety glitter with Martha Stewart iridescent "licorice" glitter and glittered all the other surfaces of the shoe. I used silver trim to pick up on the metallic star and moon sequins I added to may the night sky background.

For the glettering, I used the jewel tone opaque glitter rainbow to make ombre lettering (I didn't try to do the colors one at a time, I just shook out a teeny bit of each and lost a smidge).


A word to the wise: skip whichever color is too close to your background colors (I should've started with pink and ended on green) because it won't show up as clearly once you transfer

Glettering transferred
Finally, I added silver moons and golden stars all over the dark blue background, including the bottom of the shoe (no, it's not practical...what are you, new here?)

Side bar - note that you can use metallic confetti just like you'd use sequins (i.e. as a cool little accent on your shoe) and they come in better shapes (sequins are pretty much mostly just round). I have bought many many little packets of metallic awesomeness from Chico Party, including the night sky sequins I used here. They have a huge selection - prepare to get lost in that website imagining all the cool shoes/purses you could do. Just now, when I looked up the URL to link to, I saw these guys  and my mind started to wander to a Jurassic Park shoe we were just talking about on Facebook....and ooh, these dolphins would be awesome on another Lisa Frank shoe and...wait...what were we talking about? *Cough.* Anyway, I use E6000 to attach them to the shoe, using a toothpick to both put a teeny dollop and pick up individual sequins and move them to the shoe.

Here are lots of pics of the finished shoe:


Ready to go to its new home in just a little under 200 days!!! I'm going to try a few more ombres and will, as always, share any and everything about it here in excruciating detail. Have a great weekend!!

Tuesday, July 21, 2015

Too Funny!!

I'm dying

https://www.youtube.com/watch?v=_RZi6NCuLbQ&app=desktop

Tuesday, July 7, 2015

Sale Round Up

I was starting to think that the President had opened our strategic glitter reserves or something (we totally have those, right?) because I was seeing a lot of sale prices on glitter, but maybe it's just that people aren't doing glitter crafting as much in July, compared to Christmas (but remember: glitter is for life, not just for Christmas!)

Here's a round-up of deals going on at the moment that I know of:

- From what I've heard, Gary's is going to try to keep the glitter by the pound price down around $8.50. I also hear they've added some new colors! I will be checking it out again in August, so I will update at that time. Don't forget to like/follow Gary's on Facebook for coupons!

- Papermart.com (one of my favorite sources for buying craft supplies in bulk) used to sell glitter in these little 1 ounce tubes, and now has started also offering glitter by the pound. It's even a wee bit cheaper than Gary's ($7.70/lb plus shipping vs $8.50/lb). I still prefer Gary's (buy local!!), but wanted to share the news. I've bought the little tubes before and, assuming it's the same stuff, the color and fineness are excellent.

- If you're so hard core you're looking to buy 5 lbs of glitter instead of merely purchasing by the pound like us mere mortals (or, more likely you have some glitterers to split up a big order with you) Kit Kraft is offering free shipping (on orders over $99) and 10% off glitter until the end of July (promo code GLITTER10). They've also reduced the prices on some of their higher end glitters. It's pricier than I'd usually recommend (~$3/ounce if you get the 5 lb size), but again...I like y'all to know your options. It's also really nice quality (this stuff haunts my dreams...so pretty) and comes in a way wider range of colors than any other vendor I know of.


- I'm a fan of the Oriental Trading fine glitter Halloween four pack, and it's currently on sale ($5.78 instead of $8.50 for four 2.5 oz bottles). If you're on their email list you get their coupons (right now the coupon is $10 off and free shipping on orders of $69 or more).

- Today and tomorrow (7/8/15), Michael's has a special on flip flops (3 for the price of 1, so right around $1/pair). Even if you miss that sale, they'll start to have flip flops that (not coincidentally) ramp up as flip-flop season ramps down. If you want to do any flip flop shoes, I would start checking on them whenever you're at Michael's for the rest of the summer. When I see them for $1 or $0.50 a pair, I pick a pair or two up. Personally, I'd recommend white (since you can layer any color over it) and extra-smalls (they're cutest). I'm obviously really devoted to the classic high heel, but alternative shapes can be a lot of fun. I did a Shrimp Poboy shoe for 2015, and I've been playing with a Muffaletta shoe and S'mores shoe in the same style.

My "research" (i.e. fooling around on Pinterest) has also informed me that the Old Navy $1 Flip Flop Sale is evidently a thing. It looks like it's passed this year (appears to be annually end of June), but now that I know about it I'm going to try and catch it next year. Judging by the website, even when they're not on sale the plain flip flops are pretty cheap at $2-$2.50/pair.

I've started compiling ideas for flip flops here and will continue to add to that board.

Sunday, June 28, 2015

I'm gonna pop some tags (or whatever the shoe equivalent of that is...)

Working on lots of shoes and new techniques...should have plenty to share soon.

In the mean time, I found a new (to me) Thrift Store in Memphis, and thought I'd share my haul here. I don't imagine it means anything, since I don't know of any Muses/Nyx members here in Memphis (and if there are and you're reading this...WHY THE HECK ARE WE NOT GLITTERING TOGETHER YET?!?), but the store in question is AMVETS on Elvis Presley Blvd. If you're a Muse/Nyx Goddess passing through Memphis, first on your list should be Gus's Fried Chicken, and after lunch you should hit up this place. I didn't really have time to look through it, but they have an enormous purse selection. They aren't quite as cheap as Bloomin' Deals on Freret in NOLA, but are still quite cheap and have a huge selection. One of the perks of shoe glittering in Memphis is I'm not competing as much for the most stripper-tastic shoes.

Anyways, I first went last weekend and picked up these lovelies:

I will pretty much never pass up white shoes, because I can glitter them in pale translucent colors without the hassle of priming. I also now grab good open toe platform pumps like the two black pairs shown here because that's what I'm using for my Glittering 101 workshop. How awesomely stripper-tastic are the two pairs at the bottom? Definitely saving the red ones for something special.
When I was checking out, the cashier told me I should come back for the great big HUGE SALE they were having Sat. 06/27. She also gave me a $4 off coupon, so how could I resist? Yes, I'm that easily bought.

I went back yesterday and...bestill my heart...everything in the place was 50% off.

Little hand says it's time to rock and roll.
It was kind of a mad house (this is apparently an annual sale), but totally worth it. Behold:

I've also started keeping an eye out for big wedges like that red pair - awesome for cake shoes

These brand new still stuffed with the original tissue zebra pumps were only $4.50 a pair, so of course I bought all four pairs. They were even a teeny tiny size (5.5 or 6) which as we all know are the very best for Muses shoes.

YAAASSSSSSS
So, a very successful pair of Thrift Store runs...and a good thing because they now recognize me (buying up two dozen stripper shoes can of course have that effect) so I'm going to have to lay low for a while.

Wednesday, June 24, 2015

Bonus Cake Shoe WIP

It's still a work in progress, but I wanted to share one more crazy birthday cake shoe I'm working on.

A while back I got a 24 pack of "flameless LED tea lights" at Michael's because, with a 40% off coupon, it's not a terrible price for fake flame components. By now y'all must think I live at Michael's, I swear...

Anyways, after a little quality time with the soldering iron and some extra components from RadioShack, the fake tealights have successfully been converted into fake birthday cake candles!!


The six candles were glued into a "standard" cake shoe, and all the wiring secured and covered with plenty of fake frosting. Because I think a Muses shoe should have a longer lifetime than the average Carnival throw, the lights are rigged up with a switch (discretely hidden in the icing) and the battery housing in held in place with white velcro and has some extra slack in the wiring so it can be relatively easily removed when new batteries are needed.


Not quite done, still needs some embellishment, glitter and glittering. If the color scheme rings a bell, it's because I've been trying to frost the cake to match the Gambino's Bakery sign.

Isn't it going to be fab?

Saturday, June 13, 2015

Cake Shoes - Great Big Enormous Tutorial Post!

After the workshop today, I was inspired to push through and finish this tutorial up. A lot of what's described here will be easier to show versus tell = we're still working on the video, I'll share here as soon as it's ready.

As I described in this post, I had a number of sources of inspiration for these shoes, especially Shoe Bakery and great Muses shoes like this one.


Materials:
  • Shoe(s) 
  • Hot glue gun and sticks 
  • Silicone caulk for the frosting
  • Glitter
  • Mod Podge
  • Cake Scented Oil
  • Sponge
  • Embellishments   


STEP 1 - Adding "Cake" to the Shoe

I've bought sponges from a few different sources, including this sponge on Amazon. I don't think it matters too much what you use, so long as the holes aren't too big or too small (obviously you want it to look like cake porosity-wise):


The first step is to cut your sponge into nice thin slices. You may want to let the sponge dry out a little to make it easier to cut, whatever you find easiest. It's ok if they aren't all perfectly even, just try to get them as thin and even as you can. It helps if the knife is very sharp but please, please be careful!

Sponge cut into slices (and some extra bits)
Shoe-wise, you'll want either a chunky heel or a wedge. The bigger the better - this gives you a lot of surface area to work with, especially if you're planning to do a cake with a lot of layers like a rainbow or doberge cake.

I like to hot glue sponge onto the sole first, then move onto the layers moving from the bottom up. Cut the sponge into strips of the desired thickness, and then attach to the shoe with hot glue. You'll probably need to glue strips together, as the sponge won't reach all the way around in some places. Don't worry - a lot of the join gets covered by glittering.

This was the first one I did, so I hadn't get figured out to put sponge on the sole before doing the layers, but other than that this shows the layers (pre-glitter, pre-frosting) pretty nicely

Next up, glitter the cake. It's tempting to start frosting right away so you can see the transformation, but it'll be easier and yield a cleaner final product if you glitter the cake now and add the frosting when that's done.

If you glitter the cake before you add frosting, it's ok to color outside the lines a little bit, since it's going to be covered with frosting anyways. I've tried both ways, and I find this a lot easier than trying to keep the lines clean after everything's been added.
For cake shoes, I like to use a translucent iridescent glitter. My personal favorite for this application is Martha Stewart iridescent which I usually "cut" with some crystal glitter (I like Crafter's Choice for this, though ArtMinds stackable is probably the cheapest option). Adding the extra crystal glitter makes the color a little paler and more cake-like, and has the added bonus of stretching the pricey stuff a little further.  I usually get an iridescent 12 pack when I have a 40% off coupon to burn at Michael's or when Martha Stewart craft supplies are on sale (admittedly pretty rare). The little 0.37 ounce bottles aren't a lot to work with, but you can stretch it with a cheaper crystal glitter or pool multiple bottles. I also have a few of the bigger 1.5 ounce bottles in a few colors, but be warned - they are pricey. I want to say $6 for a 1.5 ounce bottle (well above my usual $2/ounce cut-off), but I use coupons religiously and they really are very pretty. That's actually not a bad price for the 12 pack on Amazon right now ($12.50 for a 12 pack, so ~ $3/ounce). As always, shop around and compare prices, prices can fluctuate.

12 pack of iridescent glitter on Amazon
As long as it's translucent rather than opaque, you can sub in whatever glitter brand your heart belongs to.Recollections and WOW! have some good translucent colors to work with, and I also recently bought 1 lb each of of orange and pink from Gary's for just a little over $1/ounce (on sale right now for half that!!) that should work as well:
My haul from my last trip to Gary's - note the ONE POUND bottles of pink and orange translucent glitter.
As a little bonus, on these shoes I'm mixing scented oils used for candle making into the glue. That's right: these not only look like cakes, they smell like them too! Scratch n' sniff Muses Shoes - you heard it here first. I will admit, this is maybe a little nuts (even for me), and I might be taking it too far, but it's my first year riding - the shoes need to be special!! I have used vanilla oil from Michael's, and this Birthday cake oil I bought online (wholesalesuppliesplus). Both smell quite delicious. Wholesale Supplies Plus has a huge selection of scented oils - I know we all already put a lot of money into Muses shoes, so there's no need to overdo it, but you could really go wild with "scratch n' sniff" concept - a coconut scented shoe with a beach theme and seashells, a floral scented shoe with fake flowers, a peppermint/Christmassy scented Mr. Bingle shoe....so many possibilities!

Until June 30 the birthday cake oil is 15% off (not a huge discount, but every little bit counts). You only need a little bit to scent your glue, but the more you buy the cheaper it is per ounce, so maybe consider splitting an order with some other crafters?

I started these early so I could check how long the scent lasts, but I am planning of saving enough glitter for each shoe to add a fresh coat with the scented oil-spiked` glue to the sole of each right before the ride for absolute maximum scented deliciousness. Depending on how far ahead of time you make your shoes, you might consider this option.

Here are some shoes where the cake has been added and glittered, but nothing else has been added yet:

Rainbow cake after glittering the cake layers

Doberge cake after glittering the cake layers

STEP 2 - Adding Base Frosting to the Shoe

I use DAP Silicone Caulk (which as I've mentioned was inspired with the DIY Cake Postcard Tutorial), which you can purchase at Home Depot, or order online. I got mine from Amazon for $2.28 per tube here. It comes in different colors, but for some reason the white is cheaper than the others. Most of the time I'll use white with a little paint mixed in, but after some trial and error, I've come to the conclusion that for chocolate frosting you probably want to spend the extra couple of bucks for the brown caulk.

DAP Silicone Caulk at Home Depot
The real trick with working with caulk for crafting is getting it out of the tube and into a piping bag.
My trick for this is to squeeze near the bottom of the tube pressing the bottom cap until it pops out. This may be easier to see on the video, but here are some pictures:


After I get the end cap out of the bottom of the caulk, I transfer to a cup to mix or directly into a piping bag if I'm not tinting it. I have a butter knife that I've just sacrificed to be for crafting only (a plastic disposable knife is too flimsy). I tint the frosting with Tulip or another fabric paint, then mix with disposable chopsticks or another similar tool.


Once the "frosting" is mixed, I transfer to a Ziploc bag (again, with the butter knife). If I'm doing the base layer of frosting, I just snip the end off. If I'm doing fancier edging or lettering I have a pastry tip already in the bag before I add the frosting (I often secure it with a bit of tape because the caulk is pretty thick). As long as its protected from air, the caulk will stay soft/pliable, so you can put the cup of frosting in a sealed ziploc bags and have it remain "fresh." You can also put piping bags inside a Ziploc bag to save it for touch-ups later (that way you don't have to try and re-mix a matching frosting color later on). I don't know for sure how long it'll last like this, but definitely at least a week.


I've had success with pastel frosting, but less so with dark ones like chocolate. I've tried a couple approaches to mix frosting that looks chocolate, but I'd recommend you just go ahead and use the brown silicone caulk from the get go instead and don't add any additional glitter on top of it, as shown here on the Oreo Chocolate shoe:


For the base frosting, I simply cover the shoe, piping from the bag then smoothing it out a bit with a knife or (since this isn't actually edible) my gloved fingers. I let that dry, then add glue and glitter. The caulk isn't quite sticky enough to hold the glitter, so you want to wait for it to dry and use glue. I usually do the frosting between layers and the base frosting at the same time/using the same color. A nice small opening in the bag helps keep the frosting between the cake layers.


Shoe with its base frosting done and ready to be glittered

Once the base frosting is dried and glittered, I add decorative edging frosting along the edges and add some flourishes as desired. There are lots of great video tutorials on decorative piping on YouTube. I watched a bunch, then just started playing around and experimenting. The piping is easy to wipe off if you make a mistake, or if you don't want to pipe directly onto the shoe right away, you can use a modified version of the transfer technique: pipe onto a plastic bag, then peel and glue the dried frosting onto the shoe like any other trim.

And now, a word about other frosting options. I really, really love the silicon caulk, but I did want to mention a few alternatives because everyone is different. I saw this product on my most recent trip to Michael's. And I looked it up Amazon: MOD PODGE Collage Clay


It comes in two colors, strawberry pink and vanilla. If my math is right, you get 11 fl. oz of silicon caulk for $2.28 versus 4.23 ounces of Mod Podge Collage Clay for $9.99 ($7.91 on Amazon, $5.99 if you used a 40% off coupon)...so the silicon caulk is about TEN TIMES cheaper! Granted, I haven't tried the collage clay (and don't honestly plan to), so who knows, maybe it's better, but I have a hard time believing it's that much better. I did watch this video on tips for using Collage Clay, and while it seems more versatile that silicone caulk, I stand by my assessment when it comes to frosting fake cake shoes. In a similar vein, there's the slightly cheaper Whipple Decorating Creme. Again, I think silicone caulk is more cost efficient.

Martha Stewart has a DIY tutorial for the cute cake box wedding favors, and for that they use a Japanese product for making fake whipped cream called Fando Whip Type Clay, which looks pretty good but seems a little tough to find (seems like you have to order it fom Japan).

There are a lot of other excellent  fake cake tutorials out there with recipes for fake frosting, so you may well find something that works even better for you than the silicone caulk. I'm going to experiment with lightweight spackle next, as I'm hoping to get a lighter more whipped texture to play with for when I want a whipped cream effect. I will of course update here as I try new things.

STEP 3 - Decorative Frosting and Other Finishing Touches

I've been practicing piping roses, but confess to being a total cheater when it comes to the roses on my shoe, using these foam roses from papermart.com. Once covered with glitter and accompanied with some fake frosting leaves (made with the special leaf piping tip and some pale green tinted frosting), they look marvelous:


For candles, I use the striped paper straws that are so popular now. I found mine at Michael's, but you can also get the from Amazon. I add little fake yellow glittered flames to each, which I make from cut up silk flower petals.

Mixing a little chunky glitter in with fine pale yellow glitter results in a Funtetti effect. I used about five shades of chunky glitter, but only the blue and pink really show:


The Martha Stewart cake box favors DIY I linked above uses more realistic fake cherries (I use glittered foam spheres that Michael's carries from time to time as vase filler), which is definitely a cool effect, if a little pricier (about $1 each per cherry, plus shipping). You could use either bing or maraschino cherries. Here's another fake food supplier (there are many) that has bags of 48 bing cherries for $13 (plus whatever shipping costs).

For the oreo on the cake, I used a silicone mold to make cookies out of black polymer clay and piped a little white silicon caulk between them. The first couple of cookies came out a little imperfect, so I crumbled them up to stick in the icing. I've been making other fake candy out of polymer clay to decorate cakes and loving the results (next I need to make some false pecans for some Southern cakes).


I also made some fake "2016" candles using translucent polymer clay with floss for the wicks (seen above on the yellow and pink Funfetti cake).

Martha Stewart and Recollections both make microbeads (Martha Stewart here, Recollections here), which I'm planning to try something like that out as fake sprinkles. There are also microbead mixes on etsy and you can also make sprinkles like these from polymer clay. Plenty more to experiment with!!

I will continue to update this tutorial as I learn new things, but that's more or less everything I've worked out so far! If you have any questions, definitely drop me a comment, and if you figure out any tips and tricks for cake shoes I would of course love to hear them!!!