Yay! It's that time of year again: the Miss America Show Us Your Shoes Parade! I blogged about this here last year, and today saw a link to a photo gallery of this year's shoes on the Muses Facebook page. Lots of fun inspiration there to get the creative shoe mojo flowing if you've started work on your 2015 shoes. My favorites are Miss Maryland. Miss Montana and Miss Oregon
Also, this made the rounds a little while ago, but I've been slowly working my way through the links in this awesome NOLA,com collection of "daliy meditations" on Carnival. It helps make it feel like Carnival 2015 isn't that far off...
My shoe glittering will be slowing down for a while, as my son arrived last week, but there will probably still be progress updates and pictures here from time to time.
Thursday, September 18, 2014

Wednesday, September 10, 2014
Great, Big Snoball Shoes Post! (Lots of pictures)

For some reason, I have no idea why, I decided this was the year I was going to completely master Snoball Shoes. I made a Snoball shoe last year (this shoe, which currently lives at Hansen's). I really, really loved the 2014 one, but thought there was still a lot of untapped potential in Snoball Shoes. My research/reference images for Snoballs are compiled on this Pinterest board.
I like the round sphere shape, but also wanted to try some foam eggs as bases to give the shoe that more conical look some Snoballs have. After some research and fiddling with foam shapes of different sizes, I've settled on these eggs and these spheres (both from Michael's):


The spheres are the 3", the eggs are 2 13/16 x 3 7/8 inches. I bought a 6-pack of the spheres so I'd have plenty to experiment with. Note that foam eggs are particularly easy to come by at Easter time, if you're shopping/planning year round. I also bought a 2-pack of slightly larger 4 x 2-5/8 inch foam eggs from Amazon and those also worked fine. The foam is denser, so it's a little tougher to carve, but more substantial.
Those sizes wound up being the best fit for the generic disposable cups I used this year:
 |
| Doesn't look like much yet, but after plenty of glitter it will. |
So far, I've done three different Snoball Shoes for 2015. I have more details on how these were made, but things are a little crazy at the moment, so tons of pictures for now (which I think is what most people are looking for here anyways), possibly more details down the line.
The first features a nectar cream spherical snoball that most closely resembles the 2014 shoe:


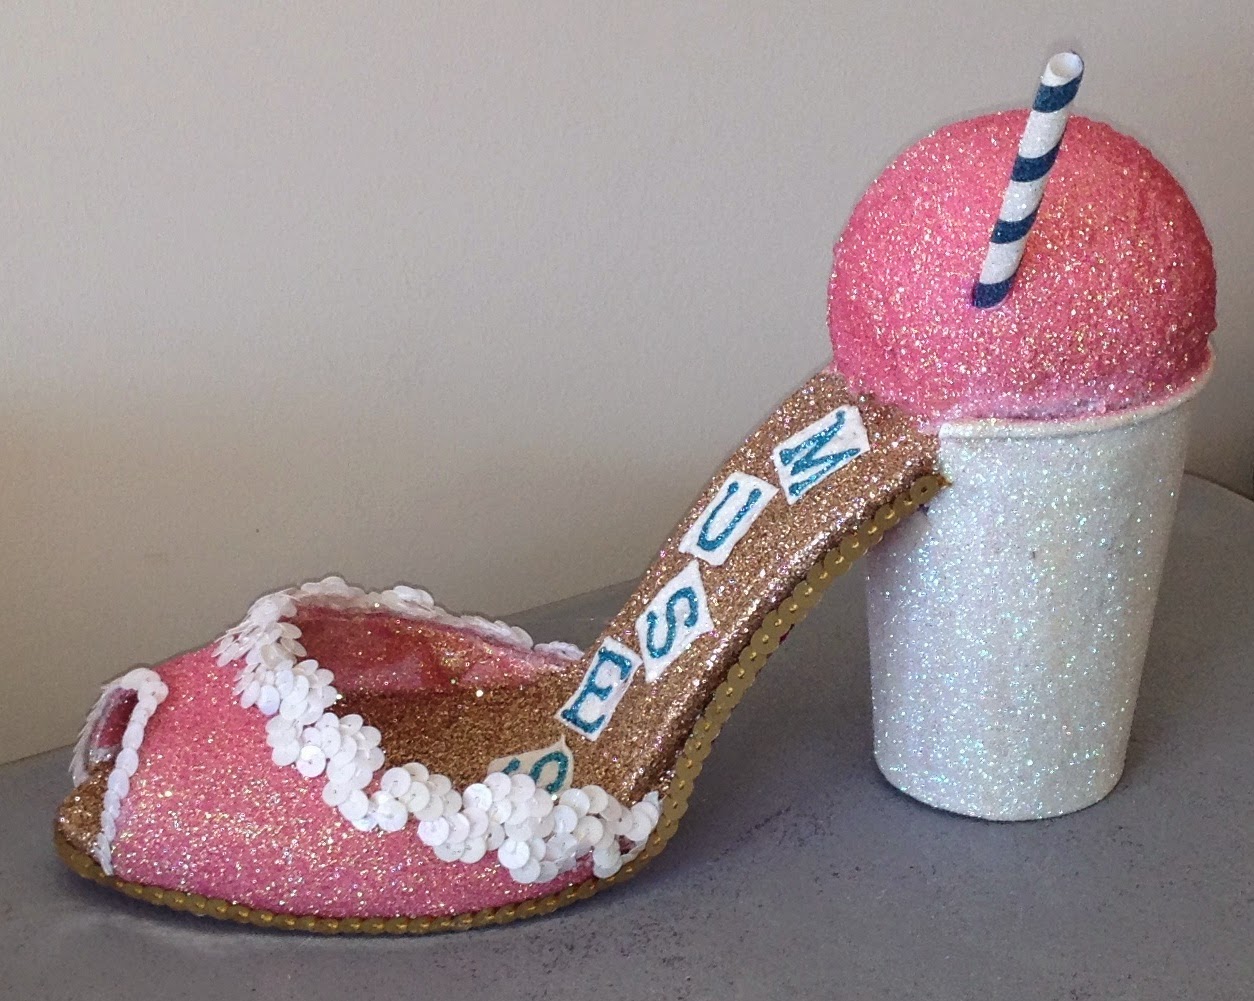
The pink of the snoball and the foot of the shoe is Martha Stewart in color "cotton candy" (which, to me, looks just like nectar cream). The interior is Recollections "champagne," the sole is Recollections "rasspberry" (though it doesn't show in the pictures). I made the straw blue and white striped as a nod to the Defend New Orleans snoball shirt. I may add more to the cup so it isn't so plain, and this still needs the year added (probably on the foot).
Next up, a cone-shaped Rainbow snoball. I wanted to pick another flavor that was recognizable besides Nectar Cream, and thought this could look pretty (I pinned a bunch of reference images for rainbow snoballs/snowcones/etc.)


The interior of the shoe is Recollections "peacock" and the foot is ArtMinds stackable. For the cup, I did a glittery version of this paper solo cup. I glittered a white straw and white spoon handle to complete the look. I don't think I completely nailed the effect of a rainbow snoball, I'll keep experimenting with it (maybe I'll attempt a Hansen's Creambeaux next?)
The last one is the least literal/most interpretive of the 2015 Snoball Shoes, in the sense that it doesn't really look like any snoball you've ever ordered. It's meant to be an interpretation of the Hansen's sign (lots more pictures on the Hansen's Facebook Page), which is also the artwork on the Dirty Coast Hansen's shirt (We are big, big fans of Dirty Coast...I already have this onesie for my baby, even though we don't live in NOLA right now). I really wanted to try and recreate that gorgeous color gradient on the snoball:
 |
| Reference images of the inspiration for this shoe |
 |
| The finished shoe |
I tried to create the textured effect of the sno-bliz in the poster, so I added waves of silicone caulk. This is what the base shoe looked like before glittering (I primed the shoe with which spray paint, and stuck the umbrella and cherry on there to get an idea of what the final effect would be):


The gold of the cup and foot are Martha Stewart "yellow barite." I did the lettering in blue and green to match the cup on the Dirty Coast shirt (though I replaced "PARTY" with "MUSES" and "BLIZ" with "2015"). When the sign and the Dirty Coast image differed, I generally chose the Dirty Coast version: I used the New Orleans flag rather than the American flag, and included purple/pink towards the bottom of the snoball rather than just orange). I made the flag out of foam and a toothpick, the umbrella is a little cocktail umbrella that I trimmed down. The cherry is a red glitter sphere that I added a glittery green stem to:
 |
| Shoe from the back showing the cup lettering |

To get the shading right on the snoball itself, I used five shades of iridescent glitter, and mixed four additional custom blends for the transition areas (9 colors total). The interior and sole are both Martha Stewart, but I don't recall the color names.
Now that it's done, I think I could've gone a lot more dramatic on the texturing, although I do love the way the coloring came out - like a glittery sunset!
I also wish I'd chosen a shoe with a less "busy" design (I worry that the crazy snoball with all it's colors and embellishment fights a little with the dramatic strappy foot). But overall, a very fun, very productive experiment.
Here are some group shoots, mostly because I'm pretty proud of these:


154 days until Muses 2015!!
Sunday, August 10, 2014
Updates and WIPs
Less than 200 days until Mardi Gras 2015 and 185 days until Muses 2015, by my count (which is this countdown, minus 5 days).
Of course for me the work window is a little narrower: my due date is about a month and change away. So onwards with the glittering!!
The Lucky Dog Shoe is now on wheels!!
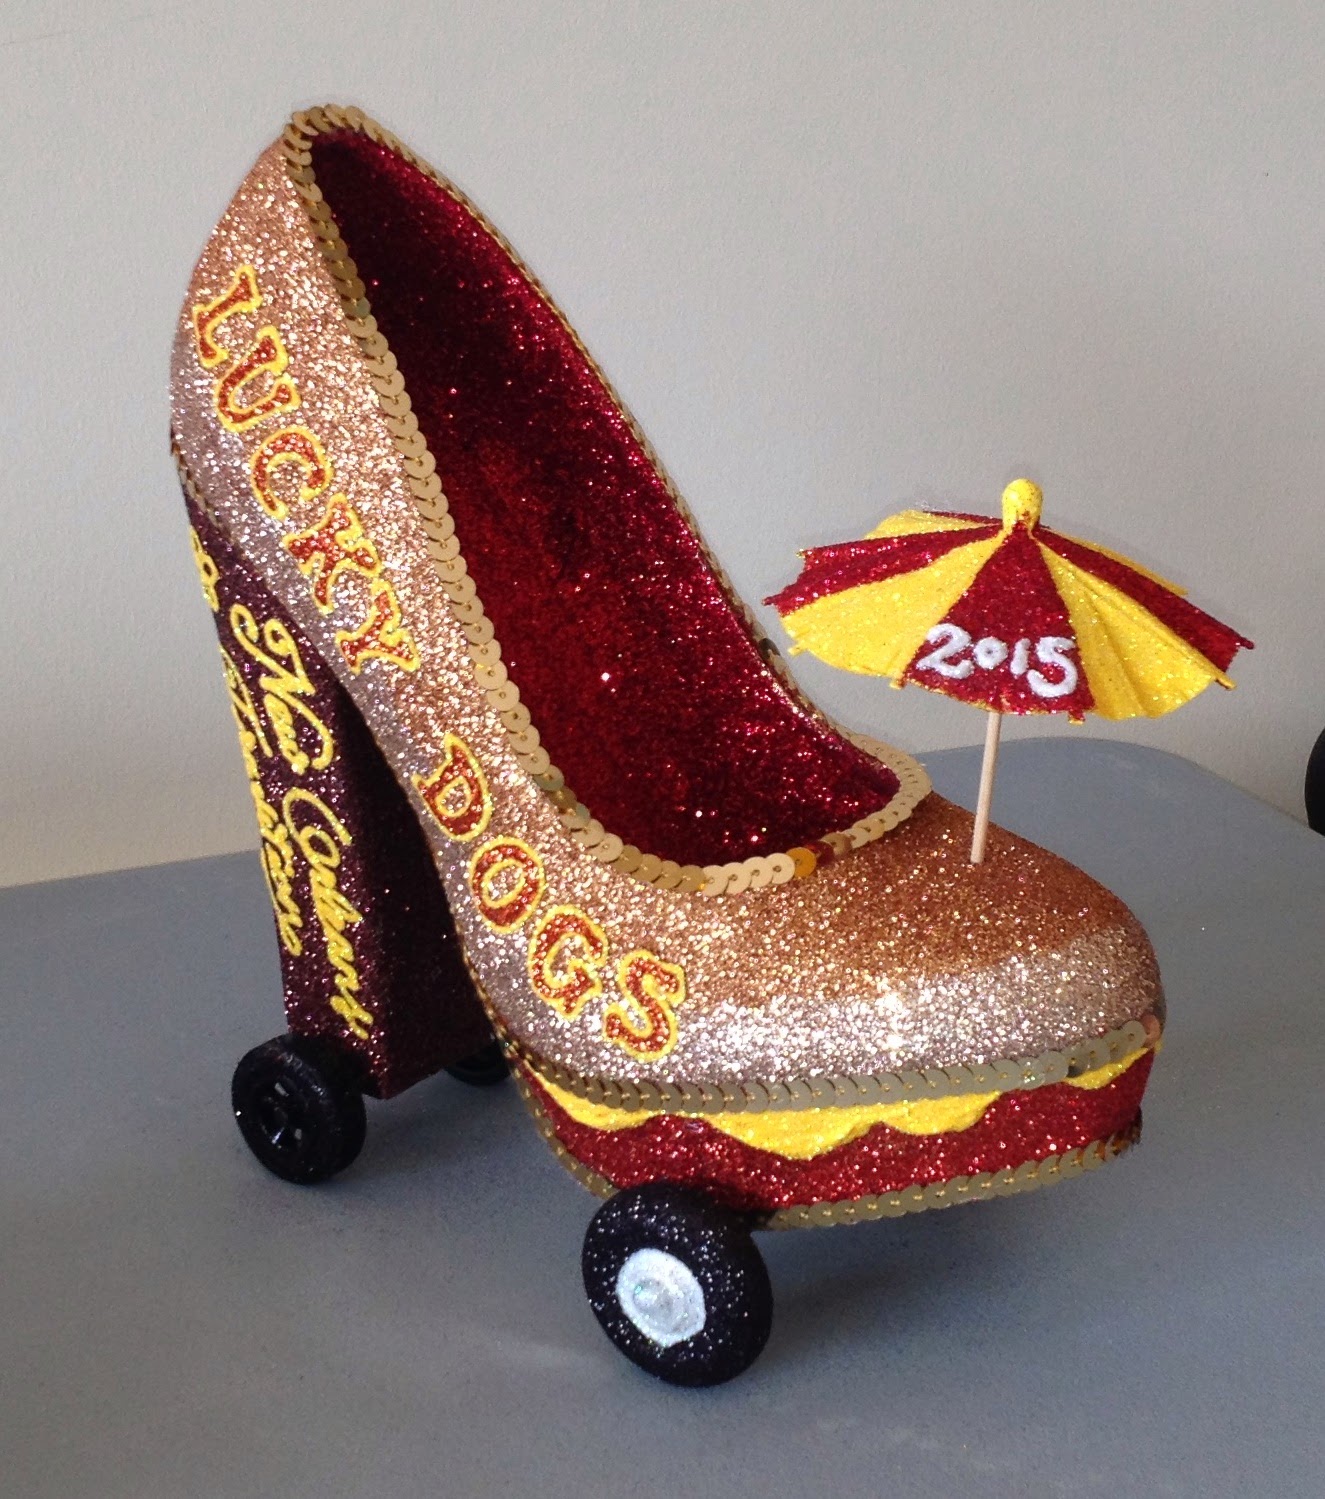
The front wheels are wooden craft wheels from Michael's (these, or something quite close/) and the back wheels are from a Pine Car derby kit glittered in Martha Stewart "onyx" with white paint and glitter on the front wheels. These don't roll freely (the axels are glued to the bottom of the shoe), but I'm thinking about re-doing them so the shoe can roll. Too far? Possibly.
And here's a collection of shoes that are all approx. 80-90% finished (glittering and finishing is more or less done, still need "Muses" and "2015" written on them and some extra touch-ups/detailing). As a bonus, none of these are food-related so I can feel a little less silly about my theme choices this year.
This one I call the Mermaid Treasure shoe:


The teal on the exterior of the shoe is Recollections "Paradise. "Recollections makes two teals: "Paradise" and "Peacock." I love both, but "Peacock" is a little bluer and "Paradise" is a little greener. The interior (which you can't really see) is Recollections "Champagne" and the sole and heel are ArtMinds stackable purple. I was going for a teal and purple color scheme to invoke the aesthetic of the Sirens of New Orleans (it's also a slightly darker-hued/more jewel-toned version of The Little Mermaid's color scheme). Edges were lined with a gold braid, which while not glittery I thought might give the shoe a more nautical vibe than sequin trim would've. My mermaid shoe research is on this Pinterest board: Mermaids and Sirens.
For a while now, I've been bookmarking art shoes where the interior of the shoe is sort of used as a vase and completely filled up, often with flowers and often as (I'm assuming) a centerpiece. If you're curious about examples of what I'm talking about, see this Halloween centerpiece, this flower and feather filled hot-pink shoe or this sort of Victorian-esque piece
I wanted to completely fill the shoe like an overflowing treasure chest. To keep the weight down, I filled the shoe interior with a base layer of little purple glittery foam balls (I wasn't sure how much they're show in the finished so, and the answer is they don't really), then layers shells on top. I had a pretty decent collection of shells, both personally gathered and store-bought, so I mixed in a couple different types and hot glued them into place. I also added a few pearls (from a strand of beads) and some sprigs of glittery "seaweed" which I bought when Michael's Christmas stuff went on sale last year (they have a really wide range of floral decor at Christmas time so it's entirely possible to pick things up that can be repurposed into something not particularly Christmassy).
So, she's done except for lettering, and maybe a little more embellishment.
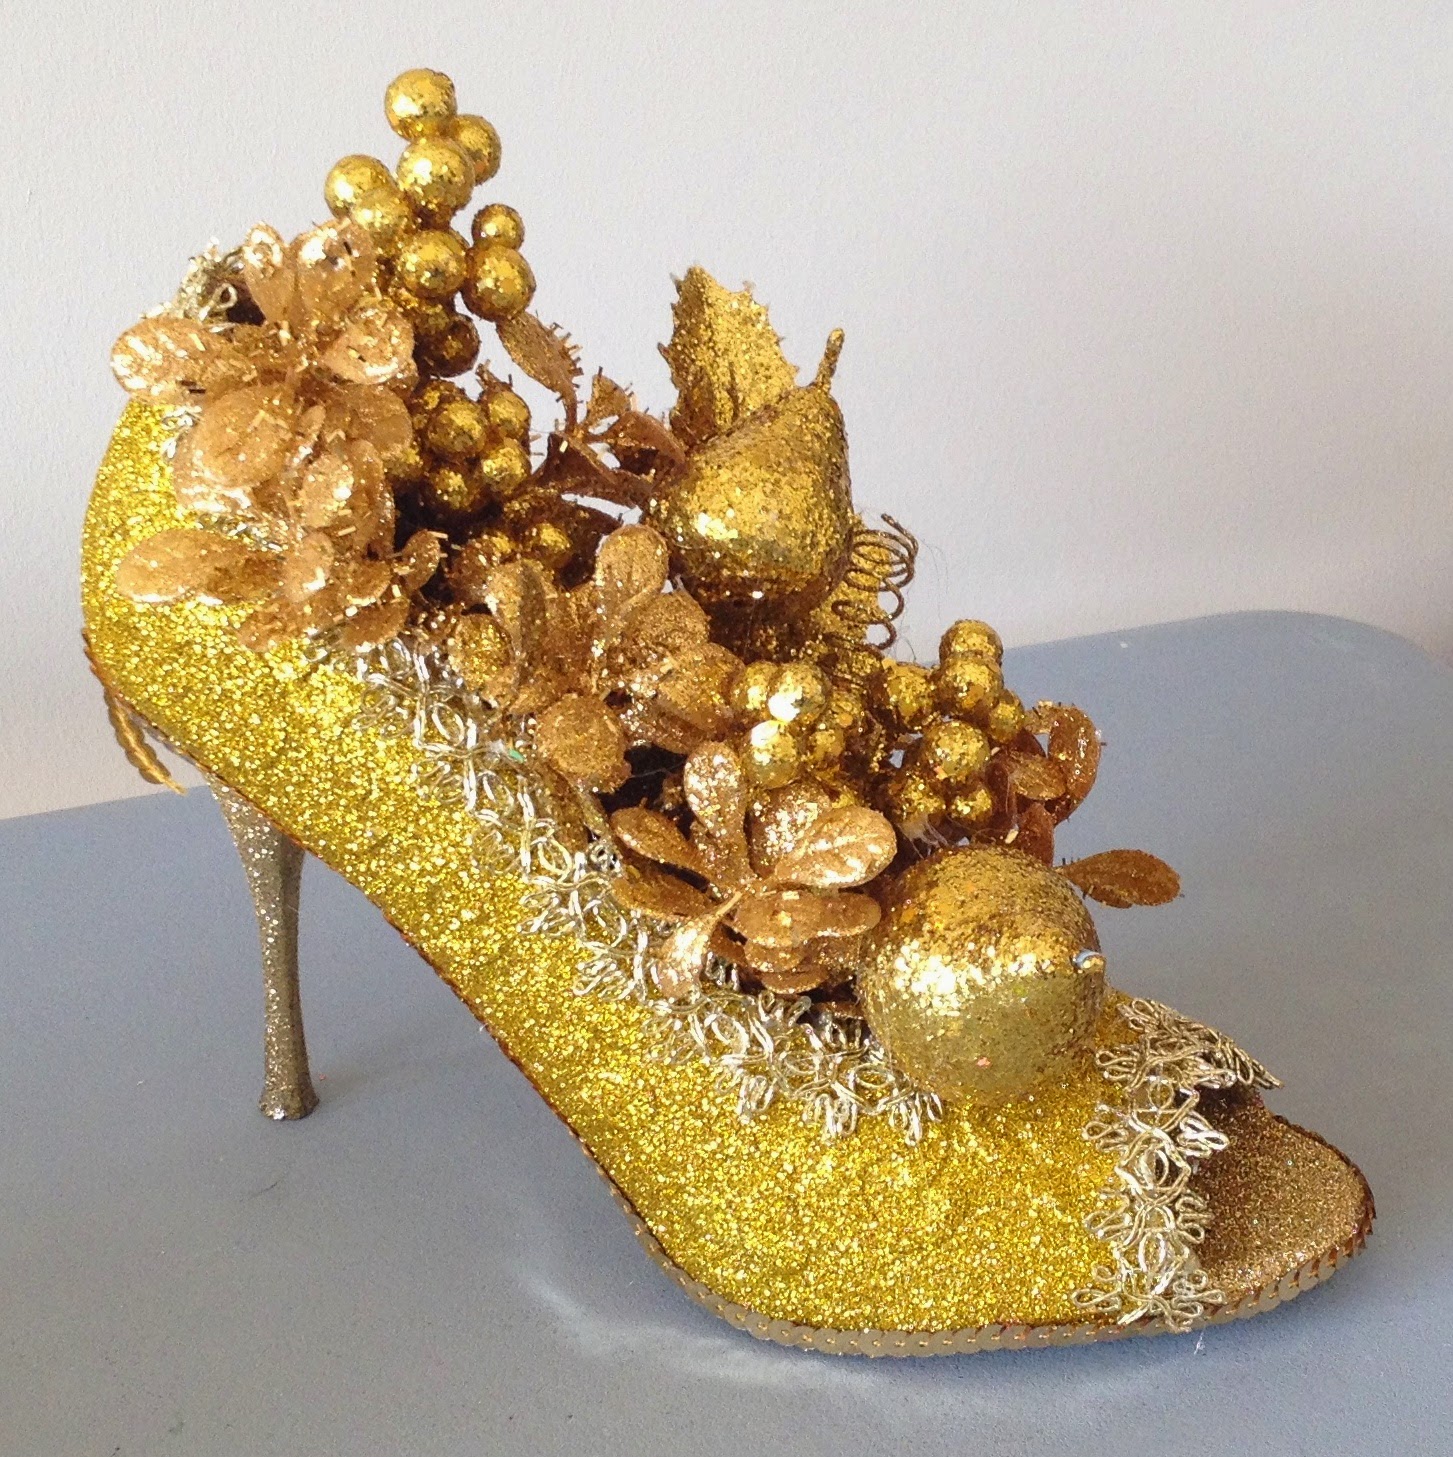
Here's another shoe in the category of me experimenting with filling up the entire entire of the shoe, which I call The Golden Goddess Shoe:


Moving along, here's my a Frozen-inspired shoe:


Hope everyone's glittering/planning/dreaming of shoes is going swimmingly! I can't wait to see what people share for 2015 (though I really a lot of that sharing probably won't happen until later in the year/closer to Mardi Gras...*sigh*)
Next post will be about Snoball shoes, including some how-to tips, so check back!
Of course for me the work window is a little narrower: my due date is about a month and change away. So onwards with the glittering!!
The Lucky Dog Shoe is now on wheels!!
The front wheels are wooden craft wheels from Michael's (these, or something quite close/) and the back wheels are from a Pine Car derby kit glittered in Martha Stewart "onyx" with white paint and glitter on the front wheels. These don't roll freely (the axels are glued to the bottom of the shoe), but I'm thinking about re-doing them so the shoe can roll. Too far? Possibly.
And here's a collection of shoes that are all approx. 80-90% finished (glittering and finishing is more or less done, still need "Muses" and "2015" written on them and some extra touch-ups/detailing). As a bonus, none of these are food-related so I can feel a little less silly about my theme choices this year.
This one I call the Mermaid Treasure shoe:
The teal on the exterior of the shoe is Recollections "Paradise. "Recollections makes two teals: "Paradise" and "Peacock." I love both, but "Peacock" is a little bluer and "Paradise" is a little greener. The interior (which you can't really see) is Recollections "Champagne" and the sole and heel are ArtMinds stackable purple. I was going for a teal and purple color scheme to invoke the aesthetic of the Sirens of New Orleans (it's also a slightly darker-hued/more jewel-toned version of The Little Mermaid's color scheme). Edges were lined with a gold braid, which while not glittery I thought might give the shoe a more nautical vibe than sequin trim would've. My mermaid shoe research is on this Pinterest board: Mermaids and Sirens.
For a while now, I've been bookmarking art shoes where the interior of the shoe is sort of used as a vase and completely filled up, often with flowers and often as (I'm assuming) a centerpiece. If you're curious about examples of what I'm talking about, see this Halloween centerpiece, this flower and feather filled hot-pink shoe or this sort of Victorian-esque piece
I wanted to completely fill the shoe like an overflowing treasure chest. To keep the weight down, I filled the shoe interior with a base layer of little purple glittery foam balls (I wasn't sure how much they're show in the finished so, and the answer is they don't really), then layers shells on top. I had a pretty decent collection of shells, both personally gathered and store-bought, so I mixed in a couple different types and hot glued them into place. I also added a few pearls (from a strand of beads) and some sprigs of glittery "seaweed" which I bought when Michael's Christmas stuff went on sale last year (they have a really wide range of floral decor at Christmas time so it's entirely possible to pick things up that can be repurposed into something not particularly Christmassy).
So, she's done except for lettering, and maybe a little more embellishment.
Here's another shoe in the category of me experimenting with filling up the entire entire of the shoe, which I call The Golden Goddess Shoe:
As described above for the glittery seaweed, I picked up some glittery gold branches in the Michael's post-holiday clearance that I thought didn't look too Christmassy and might be repurposed. I thought on a monochromatic shoe the effect might be more mythological.
The shoe is glittered in several different shades of gold: Martha Stewart on the exterior, ArtMinds on the heel and sole and Recollections on the interior.The edges are lined with gold sequin along the bottom and a wider looser almost lace like gold trim I had in the stash on the upper edge and open toe edge. Then the shoe is filled with different shades of golden leaves, vines, branches, fruit and berries (all of which was Christmas clearance). I'm going for a Greek myth vibe, some kind of hybrid of the King Midas myth and the Golden Apple from The Judgement of Paris. Still needs "Muses" and "2015," which I'll probably do in that angular Greek font.
Here I was really playing with layering sheers to see what kind of effects I could get. I was also experimenting with the Recollections tinsel glitter, which I hadn't ever tried on a shoe before. Jazz Fest made me a little braver with texture this year - I don't usually stray from ultra-fine glitter because I haven't really had great experiences with the super cheap chunky stuff in the past, but I think that made be an issue with the low quality of the chunky glitters I was using: there was some really cool use of textured glitters at the Muses demo at Jazz Fest.
The exterior is several coats of Recollections tinsel glitter in "Frost." The base shoe was a pale taupe and I thought I could get away ignoring my own advice on translucent/pale glitter and just skip priming with white spray paint. I WAS WRONG. It took twice as many coats to get an effect I was happy with. The interior and heel are Recollections "peacock" covered with the much more sheer, iridescent Martha Stewart "blueberry slush." The sole (which doesn't really show in the pictures) is Recollections "bling" (a mirrored iridescent silver) covered with Jefferson Variety iridescent white glitter. The layering gives a nice icy effect.
The trim around the top edge is a white sequin trim that I thought looked nice and snowy and the bottom edge is teal sequin trim. I made a teeny little snowman for the shoe out of two small glittery white foam balls with sticks for arms (glittered with Martha Stewart "brownstone"), a toothpick piece for the carrot nose (glittered with Martha Stewart "copper") and little black glitter facial features drawn on with Scribbles puff paint and glittered in Martha Stewart "onyx."
Still needs lettering, and I'm trying to decide what else this shoe might need...
Hope everyone's glittering/planning/dreaming of shoes is going swimmingly! I can't wait to see what people share for 2015 (though I really a lot of that sharing probably won't happen until later in the year/closer to Mardi Gras...*sigh*)
Next post will be about Snoball shoes, including some how-to tips, so check back!
Monday, July 28, 2014
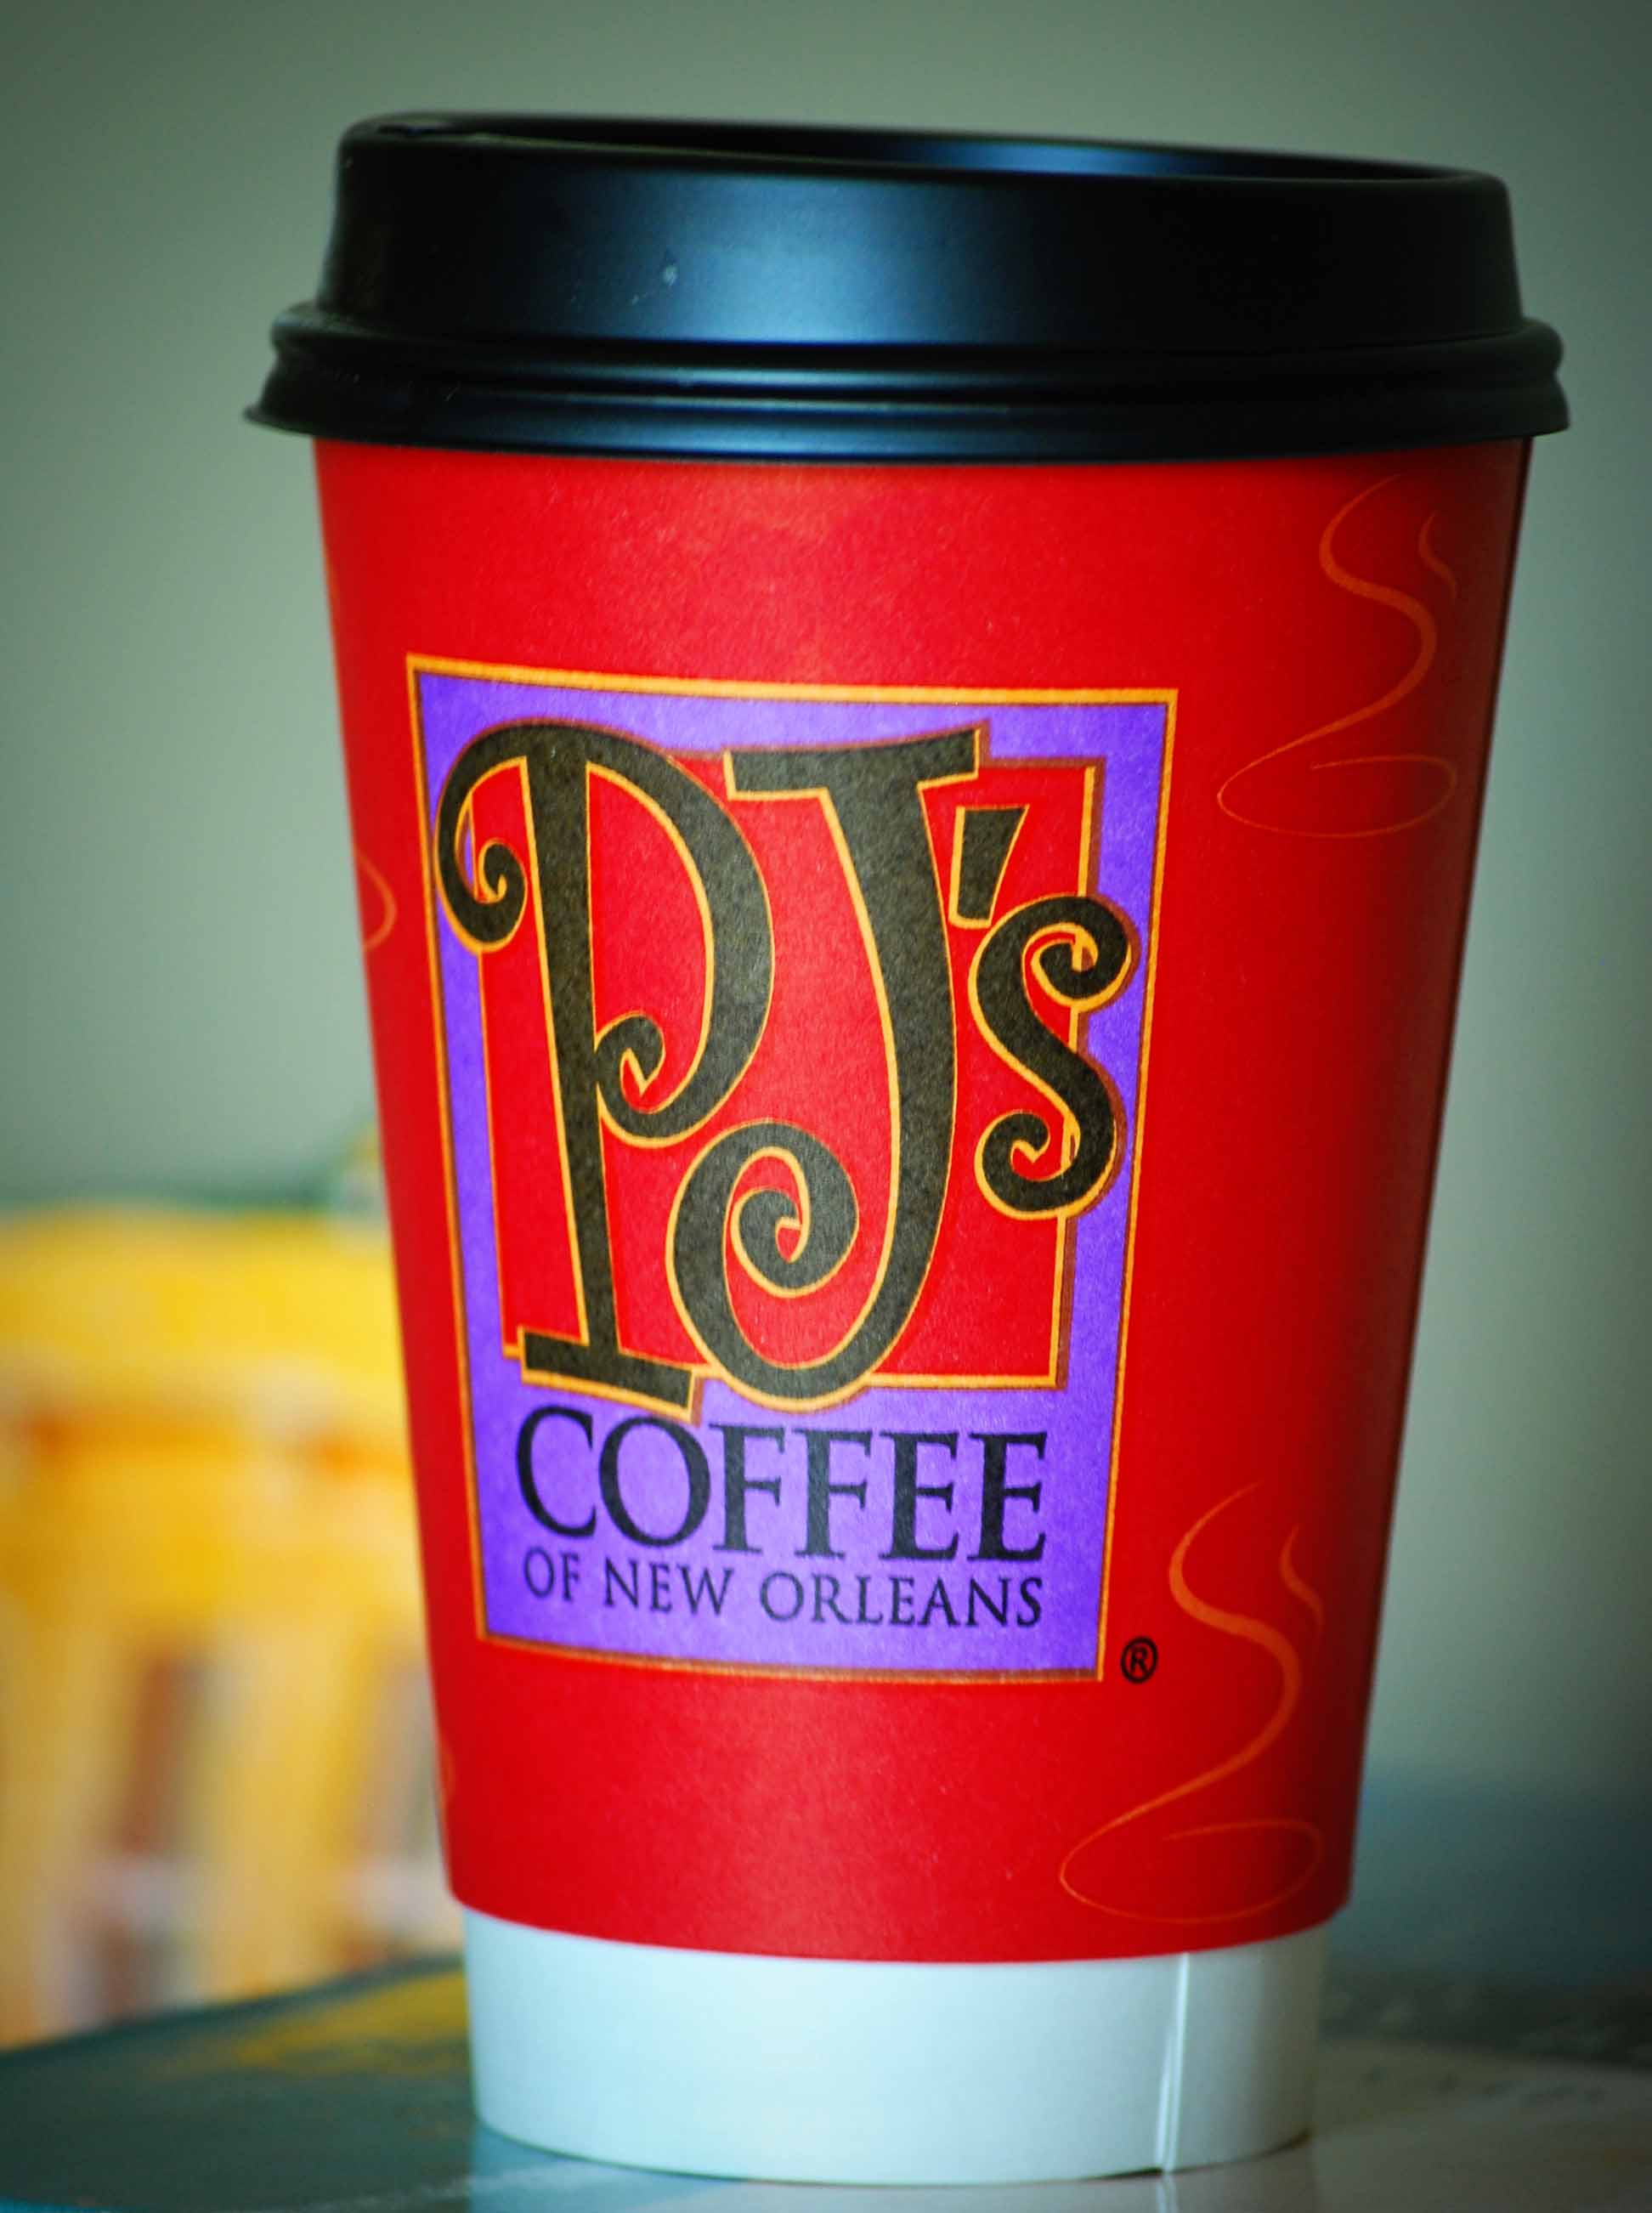
PJ's Coffee Shoe
 I suddenly notice that I have a string of shoes to share here that are all food or drink related! That's probably about 25% coincidence, 25% the fact that food and drink are such big parts of the New Orleans cultural experience and (if I'm being perfectly honest with y'all) 50% being pregnant and homesick! While there will be more food and drink shoes coming, I'll be mixing it up with some other themes too, I promise!!
For this shoe, I used the same general approach that I used on the 2014 Shoe Bliz shoe, I converted the back half of a shoe (the heel area) to a to-go coffee cup with lid. I glittered the main body of the shoe with a nice dark coffee brown (Recollections, color "espresso") then decorated the to go cup as a PJ's coffee cup. The red is Recollections "cherry." The black lid is Martha Stewart "onyx" and the white glitter on the bottom is probably ArtMinds (I have about 4 different brands that I use interchangeably when I need white glitter).

For the logo I traced and transferred using my go-to technique and did it in two pieces (the PJ's letters and the box). The purple is Martha Stewart "charoite." The yellow in the logo came out a little exaggerated because I could only get the lines so thin (I used WOW! brand "sunflower" over yellow Scribbles paint). I would've liked to have gotten the logo tracing a little cleaner, but it should still be recognizable. There are two logos on the cup, one on each side:

I covered the arch across the top of the shoe with some "whipped cream" (silicon based caulk) sprinkled with "cinnamon" (Martha Stewart "copper").
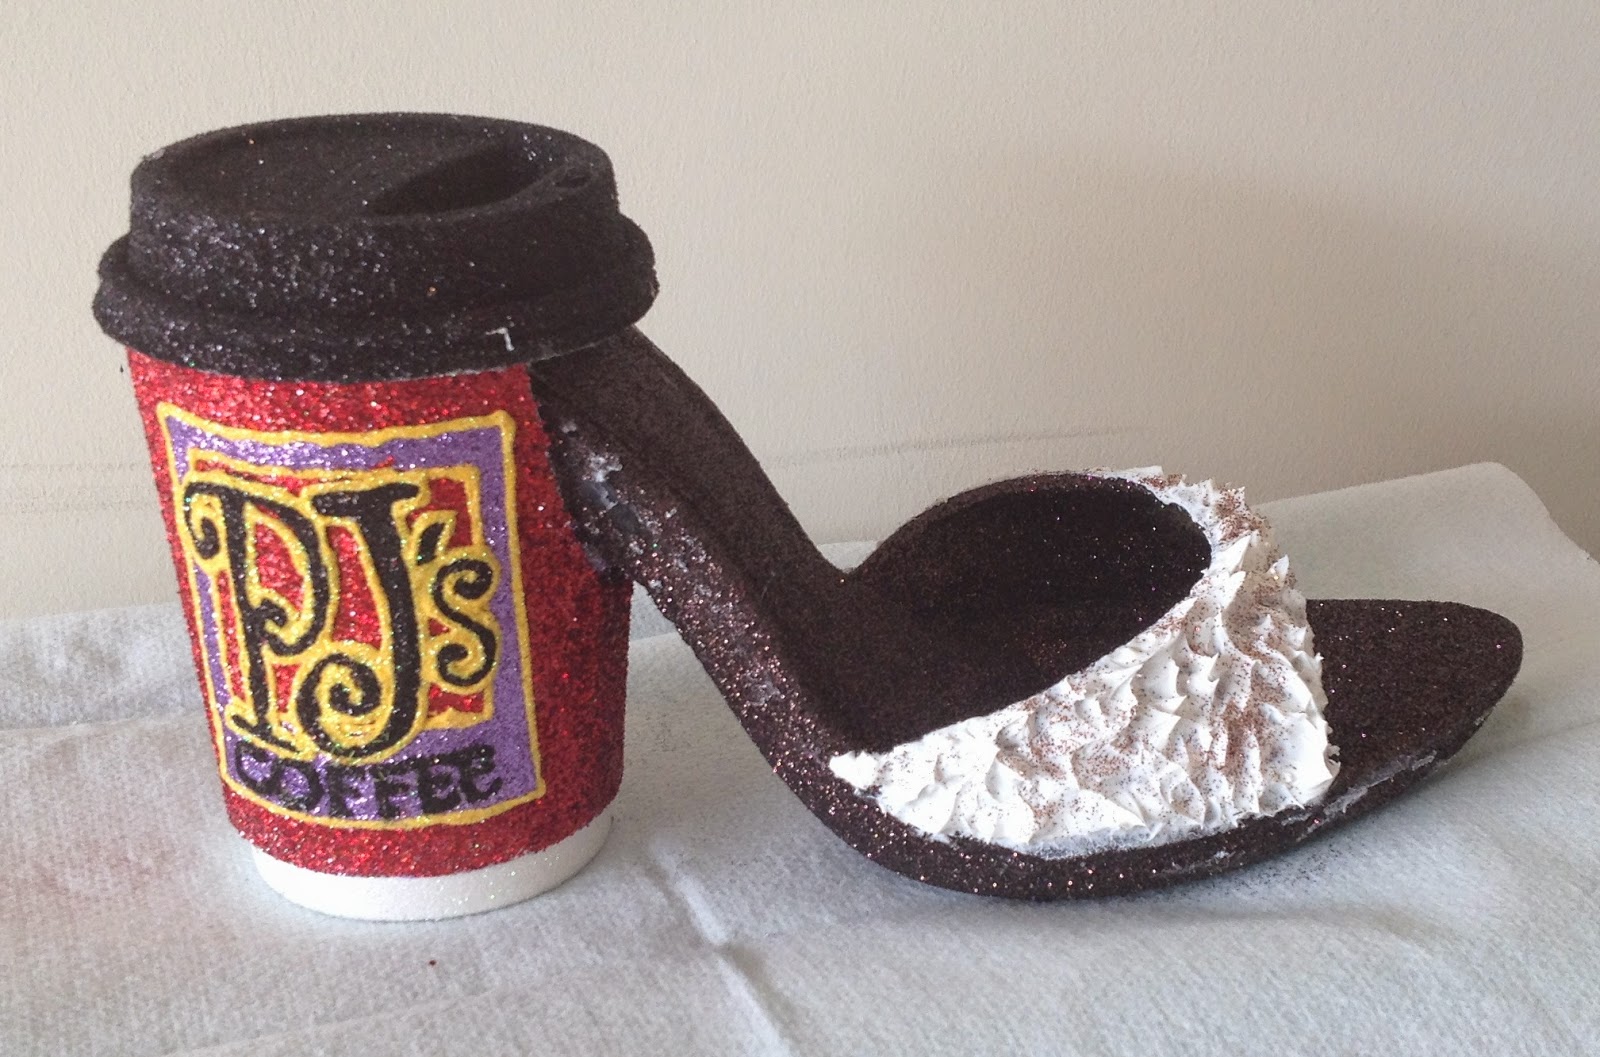
I got the idea to use silicon caulk to create texture from the DIY slice of cake postcards and I am having so much fun playing with it. I can't wait to share some of my other experiments with it here.
2015 Fried Shrimp Poboy Shoe
 Another 2015 shoe in progress: The Shrimp Poboy Shoe!
I've had this Robert Tabor sandwich flipflop pinned on my inspiration shoes board for quite a while now and finally got around to making one this year. I liked the sandwich concept and loved the idea of using flip-flops for something because I like to try a shoe-shape outside of my traditional pump comfort zone and flip-flops are super cheap (this pair was like $1 at Michael's). I did think I could make it more New Orleanean, so instead of just a sandwich I went with a nice iconic fried shrimp poboy. I should also point out that Mary Ross totally beat me to the punch on this one, making an awesome roast beef poboy Nyx purse last year.
I started out by making some paper mache shrimp to stuff my poboy. I used paper towels, Elmer's glue and pink tissue paper:
 |
| Here are my shrimp before "breading and frying" |
For lettuce, I bought some pale green tulle (same as I used to make the ruffle on the KaleGate shoe, but a different shade). The tulle was already a little glittery, but I also added some extra glitter (Martha Stewart, "limeaid"). Adding glue to the tulle to apply the glitter also allowed me to add some more naturalistic creases and wrinkles in the lettuce.
For the tomatoes, I cut circles out of foam (I traced the same circle six times, but didn't worry about following the lines too closely when I cut them out so they would seem more real). The tomatoes are Martha Stewart "carnelian" with Tulip dark red glitter around the edge for the tomato skin. I thought about adding more detail to interiors of the tomato slices like seeds, but figured it wouldn't show when the poboy was assembled.
For the bread, I removed the strap from one of the flip-flops, then covered them both with Martha Stewart "copper." On the bottom piece, I added a nice generous smear of "mayo" (white Scribbles 3D paint with white iridescent glitter). On the underside of the top piece (with the strap still attached) I added some red glitter hot sauce (which doesn't really show in the pictures or in the finished sandwich).
Here are the finished ingredients all lined up ready to assemble:
 |
| Fried shrimp and lettuce |
 |
| A little more lettuce, tomato slices and bread |
 |
| Everything lined up (I have a table just for my Muses shoes to work on now!) |
Next step, I hot-glued together the top and bottom pieces; fried shrimp went on the bottom flip-flop and lettuce and tomatoes went on the top flip flop (when I tried assembling it and the shrimp kept overflowing my husband said "don't worry, that happens on real poboys too." Sounding more and more like a native, that one...)

Lastly, I assembled the top and bottom pieces into the finished poboy:


Overall I'm pretty pleased...it's not a perfect recreation or anything, but it certainly makes me hungry for a trip to Parkway (granted, that's pretty much always the case).
Saturday, July 26, 2014
Lucky Dog Cart Shoe
After all my big talk about how much I love working on shoes year round, I went and took a very long hiatus from glittering. Apart from the Kale-Gate Shoe I posted in March, I hadn't really worked on any 2015 shoes. Various things came up: big exciting stuff at work, moving to a new place and (the biggest impediment to glittering) I got pregnant. My husband and I are expecting our first (a boy) in about a month and change. So, while I don't think I'll be able to get many shoes done for 2015 (certainly nowhere near as many as I finished in 2014), now that we're moved and settled and I'm trying to make some now while I still can. I have about a dozen shoes in progress right now. I've been working very slowly, but I have a handful of shoes in progress that are close enough to done to be worth sharing here.
We moved so we'd have more room and (joy of joys!) this included a garage where I could set up a little work space for shoes:
It's nothing spectacular but I love it beyond words. In our old place, I had to unpack and repack things whenever I wanted to work on shoes because I didn't have dedicated space, so I spent about as much time cleaning up after myself as working on shoes. Now I can work on things and leave them out, and it's way easier to find things now that my supplies and shoes are better organized.
Anyways, without further ado, let me share some pictures of a nearly finished 2015 shoe - The Lucky Dog Shoe!

This shoe is inspired by the Lucky Dog Cart, which I would guess is recognizable to any New Orleanian whose been in the French Quarter and was, of course, featured prominently in Confederacy of Dunces. The "bun" is Recollections "champagne" and Martha Stewart "copper," to achieve the two-tone effect. I could probably have gone a little browner to get the top of the bun a little toastier, but that was the closest thing I had in the stash without custom blending. The "hot dog" is Martha Stewart "carnelian" and the mustard is WOW! glitter in "sunflower" (over yellow Scribbles paint because the yellow glitter is pretty translucent). The top and bottom edges of the top bun are lined with gold sequin trim.
The interior is Martha Stewart "garnet" (to match the red box on top of the cart). The big chunky heel is meant to stand in for the brown box on the end of the cart, with "New Orleans Tradition" rotated 90 degrees (artistic license). The heel is Martha Stewart "brownstone" and the yellow lettering is, like the mustard, WOW! glitter "sunflower" over yellow Scribbles paint.
The "LUCKY DOGS" lettering is Martha Stewart "orange topaz," with yellow edging (again, "sunflower" over yellow Scribbles paint). On the other side, "MUSES" is written in the same font as "LUCKY DOGS."
The umbrella is a little drink garnish umbrella painted with WOW! "sunflower" and Martha Stewart "garnet." Where on the Lucky Dog cart's umbrella "Enjoy Coca-Cola" would be written, I've written "2015" in (Scribbles paint in "white mist" with white glitter).
We moved so we'd have more room and (joy of joys!) this included a garage where I could set up a little work space for shoes:
 |
| This was before I actually starting using it...It's a LOT messier now |
It's nothing spectacular but I love it beyond words. In our old place, I had to unpack and repack things whenever I wanted to work on shoes because I didn't have dedicated space, so I spent about as much time cleaning up after myself as working on shoes. Now I can work on things and leave them out, and it's way easier to find things now that my supplies and shoes are better organized.
Anyways, without further ado, let me share some pictures of a nearly finished 2015 shoe - The Lucky Dog Shoe!
This shoe is inspired by the Lucky Dog Cart, which I would guess is recognizable to any New Orleanian whose been in the French Quarter and was, of course, featured prominently in Confederacy of Dunces. The "bun" is Recollections "champagne" and Martha Stewart "copper," to achieve the two-tone effect. I could probably have gone a little browner to get the top of the bun a little toastier, but that was the closest thing I had in the stash without custom blending. The "hot dog" is Martha Stewart "carnelian" and the mustard is WOW! glitter in "sunflower" (over yellow Scribbles paint because the yellow glitter is pretty translucent). The top and bottom edges of the top bun are lined with gold sequin trim.
The interior is Martha Stewart "garnet" (to match the red box on top of the cart). The big chunky heel is meant to stand in for the brown box on the end of the cart, with "New Orleans Tradition" rotated 90 degrees (artistic license). The heel is Martha Stewart "brownstone" and the yellow lettering is, like the mustard, WOW! glitter "sunflower" over yellow Scribbles paint.
The "LUCKY DOGS" lettering is Martha Stewart "orange topaz," with yellow edging (again, "sunflower" over yellow Scribbles paint). On the other side, "MUSES" is written in the same font as "LUCKY DOGS."



 |
| Wee glittery "2015" umbrella |
 |
| Profile view showing the lettering on the left side |
I'm toying with getting some wheels on there as well to make it extra cart-like. I'll post more pictures if/when I add the wheels. More shoes very soon!
Wednesday, May 7, 2014
Weekend in NOLA
My husband and I drove down to NOLA to catch the second weekend of Jazz Fest and visit with family. Long story short, we had a BLAST.
Weekend highlights included my sister and I taking a trip to Hansen's (we hadn't been in forever). My sister got a half cream of almond, half cream of nectar with condensed milk and I got a Brown Pelican (cream of root beer float), both excellent choices. I saw my 2014 Snoball Shoe posted on the Hansen's Sno-Bliz Facebook page after Mardi Gras, and as it didn't wind up getting thrown in 2014 I thought it would be nice if it had a good home. The shoe lives at Hansen's now so if you stop by, you can see it hanging out above the t-shirts next to St. Joseph:

I'm working on more new-and-improved snoball shoes this year, can't wait to share them with y'all.
We hit up Jazz Fest on Saturday and (surprise surprise) I was drawn to the Muses shoe-glittering demo station like a moth to
 |
| Shoes on display |
 |
| I so love the bedazzled tulle on the cowboy boot! |
 |
| More shoes on display |
 |
| Jazz Fest 2015 Muses Shoe |
 |
| Really hard to pick, but if I absolutely had to I'd say this was probably my favorite. The colors, the big rhinestones, the marabou around the top...so gorgeous!! |
 |
| I was also pretty crazy for this one, with the pink crown and intricate pink and white pinwheels wedge. |
 |
| The work area, with Muses signs in the background (We Can Shoe It!) |
 |
| The lovely ladies posing for a picture with their handiwork |
(1) Muses Shoes by Ani Facebook Page. Her shoes are amazing, transcendent works of art. Her 2014 boots are awe-inspiring. I was literally speechless looking through them - so much detail, creativity, cleverness and artistry!!
(2) Check out Melissa Lee's Nyx purses and magician-themed Muse shoe. Gorgeous work and she includes lots of great detail on the process of making them (which I love and always wish I could find more of online). Be warned - if you're anything like me, the realization that that's her first Muses shoe will drive you mad with jealousy.
(3) Pinterest user Jenn Solberg has compiled a really impressive board of Muses shoes (and I'm not just saying that because some of my shoes made the cut!!)
Subscribe to:
Posts (Atom)