After seeing all the 90s-tastic graphic design for the
Nola Mom's Blog 90s Prom Mom's Night Out, I was inspired to do a Lisa Frank flavored shoe. I was a pretty typical 90s girl in my coveting Lisa Frank school supplies: cute animals, psychedelic night skies and everything RAINBOW all the time always.
This was also a good opportunity for me to play with some new decorating techniques: ombre (which has been rattling around in my head for a while) and free handing animal print (I've traced cheetah print before, but wanted more practice flying without a safety net).
The "trick" to an ombre (besides having an absurd variety of glitter in your stash #sorrynotsorry) is understanding that only iridescent/sheer glitters blend...opaque glitters will of course mix (they won't separate or anything) and you can get some really dazzling effects by combining them (stay tuned - more on that in a later post), but the color isn't going to look like a blend between the two starting hues. For that, you need to be using iridescent/sheer glitter. After doing a couple of custom blends, I also advise that you work with reasonably close colors for a blend: green + blue will give you a nice teal (
see the Tiffany Box shoe), or a pale pastel iridescent + white will give you an even paler pastel (which is what I've been using for Birthday Cake shoes), but if you mix white with a really bright or dark color, even another iridescent sheer, it just isn't going to blend as nicely.
So, first up I picked out my base "rainbow," which for me was Recollections "fairy dust," Gary's glitter by the pound sheer pink, then Gary's orange, then Gary's yellow, then Martha Stewart "limeade," then ArtMinds stackable sheer teal, then finally Martha Stewart "blueberry slush." All the Martha Stewart glitters in there are found in the
iridescent 12 pack and you could make a very nice rainbow just from those colors, but whenever I had anything else that would work I used it instead as MS iridescent is pretty pricey (I find Gary's yellow iridescent glitter to be indistinguishable from Martha Stewart "lemon drop" and it's an eight of the price by the ounce). There are a lot of other sheers that would work in a rainbow (I have some nice neons from ArtMinds that I think will make a really nice retina-scorcher of an ombre), so I'd encourage you to use what you have in your stash. Also bear in mind you don't have to do a full rainbow (though for Lisa Frank, it's nice).
So after I picked out my colors, I transferred a bit to
lidded 2 oz Jello Shot cups (not strictly speaking necessary, but I was running low on a few and didn't want to accidentally use it all up in blends and not have enough left of the original for my rainbow). For each color transition (i.e., purple to pink, pink to orange, orange to yellow, etc.), I shook out approx. half of each color into a 2 oz cup and shook to mix. Now I had a bunch of little cups spanning a reasonably smoothly transitioning rainbow. If you're working with fewer colors and some of the transitions are a little jarring, you may want to consider having some additional transition blends besides half and half (for example: purple, then 2/3rd purple + 1/3rd pink, then 1/2 purple + 1/2 pink, then 1/3 purple + 2/3 pink, then pink).
Because your glitter is sheer, your shoe needs to be white for this to work. I used a primed a basic pump with white spray paint. I have some white shoes in my stash, but not enough so I do a fair amount of priming. I added Mod Podge to my primed white shoe and carefully shook the colors on in stripes one at a time. Be careful when you pour off the excess glitter that you don't pour onto wet glue (pay attention to the direction of your pouring basically). If you're nervous, you could do it a few colors at a time, it's not a one shot deal like some other techniques. I would say two layers are recommended for opaque glitters, and essential for iridescents: I just don't get the same depth and intensity of color out of an iridescent sheer unless you do two (and maybe even three) coats, even if you've primed in white. You might get away with it if you've primed in a really similar colored spray paint, or if you've used the trick of putting a similarly-hued opaque layer down before your iridescent, but I generally do at least two layers. So after the first layer of glitter dried, I did another pass of glue and rainbow stripes to intensify the colors. The added bonus effect of this second layer is, because you don't exactly perfectly trace the stripes you laid down the first time (even if you wanted to you couldn't), another layer helps make the blend from color to color more...blendy, so to speak. When the glue dries, the first layer will show through a bit, so you don't want to stray too too much from your initial stripes, but a little blurring of the edges is great for the final effect.
Here's my shoe after the base of sheer iridescent rainbow ombre was done:
 |
| A little blurry, sorry about that. |
You can see not all the transitions are perfectly seamless (the yellow is a little more abrupt than I'd like), and if this was all the shoe was going to be I might think about adding a third layer to try and smooth them out a little. But it doesn't need to be perfect because the cheetah print that's going over it will obfuscate imperfections.
Step 2 - leopard print time! My "formula" for leopard print is: pale background color + black spot outlines + darker shade of the background color inside the spot outlines. This works for doing both natural and the, shall we say, not-exactly-found-in-nature leopard prints:
 |
| A few examples of different leopard prints (for a "naturalistic" leopard I would recommend Recollections champagne or Martha Stewart "smoky topaz" for the background and a copper glitter for inside the spots) |
And, as you can see in this reference image, it's also the Lisa Frank approach to rainbow leopards:
The reference images also give you an idea how the black spot borders should look: roughly circular blobs forming a vaguely oval ring that's open in a few spots. I free handed these with Tulip Scribbles and Martha Stewart onyx. Here are a some shots of the finished spot outlines:
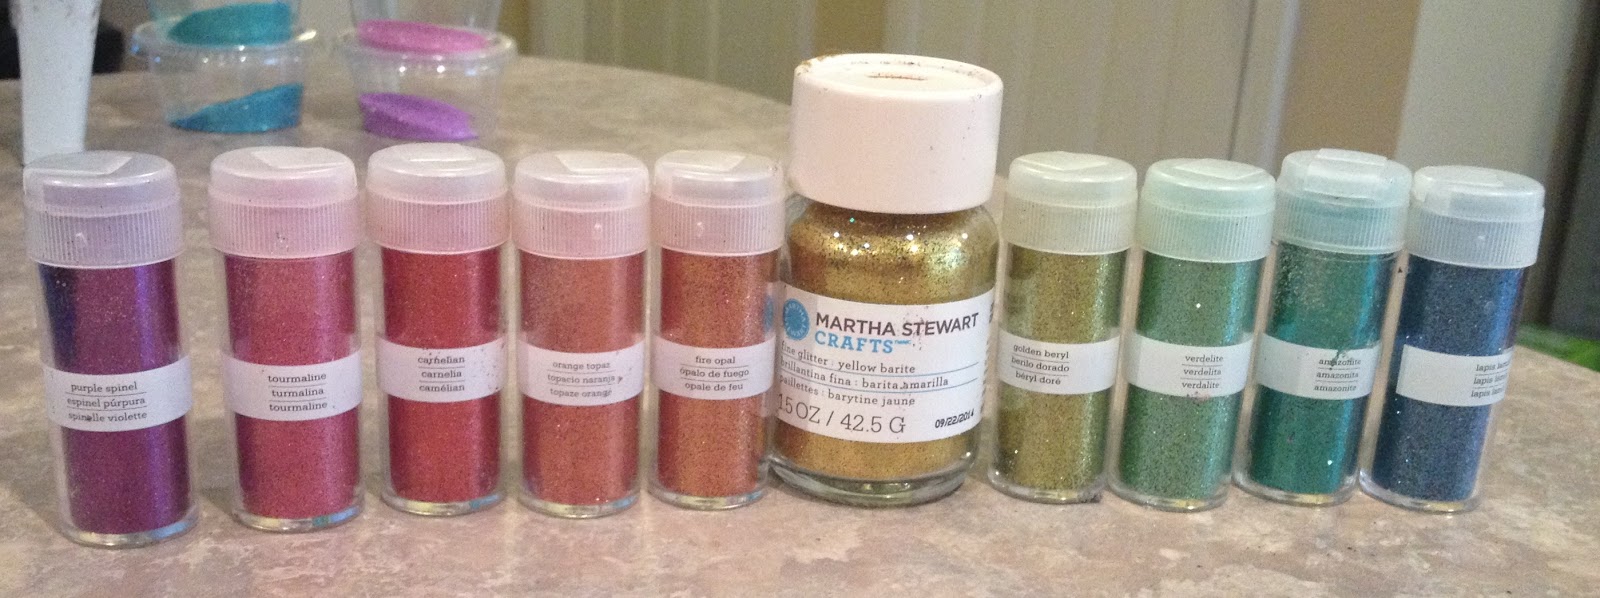
After the spot outlines were done, the last step (other than glettering and glittering the rest of the shoe of course) was to fill in the spots. Using the "fill the spots in a shade slightly darker than the background" rule I picked out a corresponding rainbow of Martha Stewart opaque jewel tones:
 |
| Jewel tone rainbow: purple spinel, tourmaline, carnelian, orange topaz, fire opal, yellow barite, golden beryl, verdelite, amazonite, lapis lazuli |
These are a combo of selections from the "Essential Glitter Set" and "Rich Essential Glitter Set" 24 packs (see
here), but I'm sure you could make do with one or the other, especially if you had other opaque glitters in your stash.
If you're curious, here are the exact details of how the jewel tone rainbow for the spot centers aligned with the background iridescent glitters (including blends) from toe to heel:
 |
| Recollections "fairy dust" paired with "purple spinel." The pink + purple transition blend paired with "tourmaline." Gary's pink paired with "carnelian." The pink + orange blend paired with "orange topaz" |
 |
| Gary's orange glitter also paired with "orange topaz." Orange + yellow blend paired with "fire opal." Gary's yellow glitter paired with "yellow barite." Yellow + green blend paired with "golden beryl" |
 |
| Martha "limeade" also paired with "golden beryl." ArtMinds teal paired with "verdelite." Teal + blue blend paired with "amazonite." Martha Stewart "blueberry slush" paired with lapis lazuli |
Using a crystal Tulip Scribbles, I carefully filled in the spots and added the corresponding opaque jewel tone glitters:
And here's the finished exterior with all the spots filled in:
Phew!! A grand total of 23 different shades of glitter in, and you haven't even tackled the interior, sole, heel, platform or glettering! But you're starting to get that awesome 90s vibe, right?
For the rest of the shoe, I was picturing a Lisa Frank style night sky. I blended some dark blue Jefferson Variety glitter with Martha Stewart iridescent "licorice" glitter and glittered all the other surfaces of the shoe. I used silver trim to pick up on the metallic star and moon sequins I added to may the night sky background.
For the glettering, I used the jewel tone opaque glitter rainbow to make ombre lettering (I didn't try to do the colors one at a time, I just shook out a teeny bit of each and lost a smidge).
A word to the wise: skip whichever color is too close to your background colors (I should've started with pink and ended on green) because it won't show up as clearly once you transfer
 |
| Glettering transferred |
Finally, I added silver moons and golden stars all over the dark blue background, including the bottom of the shoe (no, it's not practical...what are you, new here?)
Side bar - note that you can use metallic confetti just like you'd use sequins (i.e. as a cool little accent on your shoe) and they come in better shapes (sequins are pretty much mostly just round). I have bought many many little packets of metallic awesomeness from
Chico Party, including the night sky sequins I used here. They have a huge selection - prepare to get lost in that website imagining all the cool shoes/purses you could do. Just now, when I looked up the URL to link to, I saw
these guys and my mind started to wander to a Jurassic Park shoe we were just talking about on Facebook....and ooh,
these dolphins would be awesome on another Lisa Frank shoe and...wait...what were we talking about? *Cough.* Anyway, I use E6000 to attach them to the shoe, using a toothpick to both put a teeny dollop and pick up individual sequins and move them to the shoe.
Here are lots of pics of the finished shoe:
Ready to go to its new home in just a little under 200 days!!! I'm going to try a few more ombres and will, as always, share any and everything about it here in excruciating detail. Have a great weekend!!