Saturday, October 25, 2014

2015 Blush and Bashful Steel Magnolias Shoe

Every year, I like to do a Steel Magnolias themed shoe. Last year and the year before, it was the 25th Anniversary of the film and the stage version, respectively so I did pink shoes with silver accents (because it would've been Shelby and Jackson's silver anniversary).

My 2014 Steel Magnolias shoe is here
My 2013 Steel Magnolias shoe is here

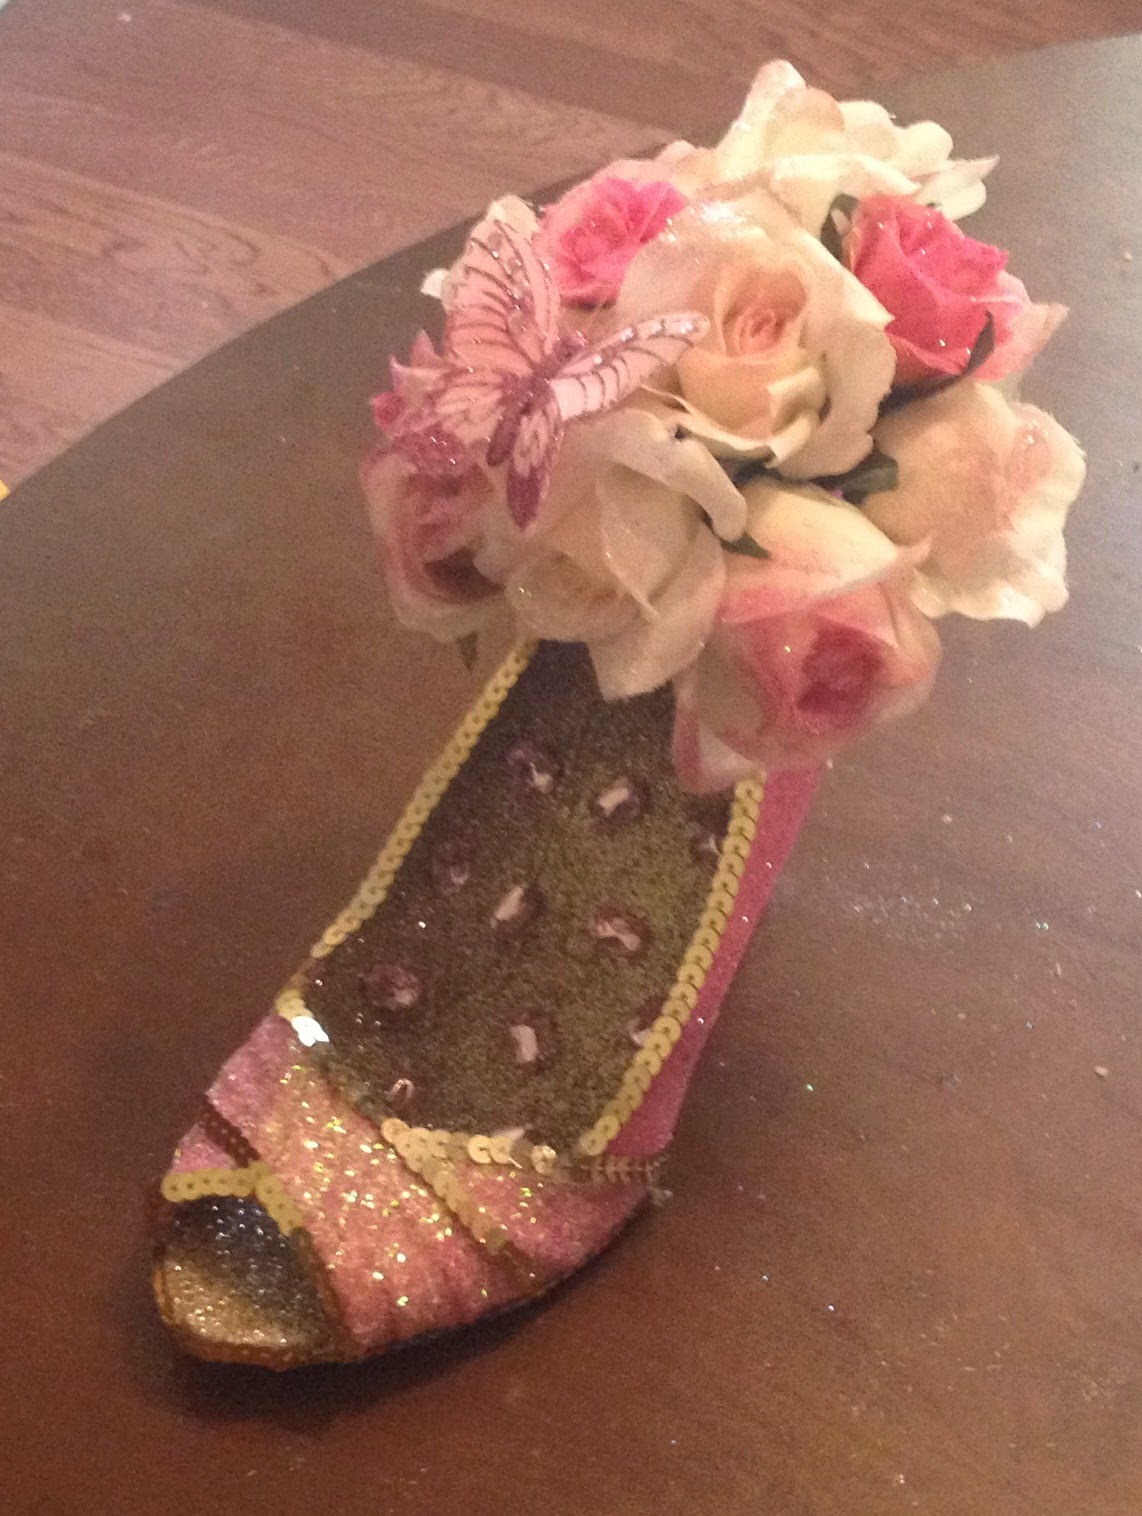
This year, I once again did a pink and pink (I mean..."blush and bashful") color scheme, but I went with gold accents and I did a spin on Shelby's bouquet. Stylistically, it's a little modern for a late '80s bride, but I like to think Steel Magnolias is timeless and that this is the bouquet Shelby would pick out if she was getting married tomorrow or, at the very least, a Muses shoe she'd be pleased to catch in February.

The interior of the shoe is Recollections "champagne." The heel/sole of the shoe are Martha Stewart "copper." The exterior of the shoe is primarily Martha Stewart "cotton candy" and the foot straps are the tinsel cut of Recollections "blush" which I used last year. The edges are lined in gold sequin trim. The lettering (Muses on one side, 2015 on the other) is Scribbles "white mist" with Martha Stewart "bubble gum" over it.

The bouquet is a mix of different flowers I picked up over time, including some pale pink roses and some of the Spring floral bunches I picked up 70% off this summer. I added a little glitter to the flowers (three shades of pink). I also added a pink butterfly perched on the bouquet and sprinkled some lovely emerald-cut pink rhinestones in the interior of the shoe for a little extra punch of tickled pink.

The pictures aren't fantastic (it was a little gray out so the light wasn't really bright enough for the flash-free pics to come out well, and with the flash they always look a little weird), but with a new baby in the house, they'll have to do for now!


109 days left!! Nearly into the double digits. How's everyone else's shoeing going?

Thursday, October 23, 2014

FAQ - How do you do the lettering on your shoes???

I only really have one Frequently Asked Question, which is “How do you do the lettering on your shoes?” To save myself the trouble of writing out my answer over and over, I thought I’d put together one write up and link to it whenever the question comes up:

Every shoe I do needs to have “Muses” and the year on it before it’s considered finished. I’ve gotten better at doing the lettering the more I practice, but even so I was tired of having to re-do lettering if I wasn’t happy with it the first time, so I ultimately switched over to doing a transfer approach. Transferring takes a little more time, but compared to writing directly on the shoe, you get cleaner lettering and more control over placement/spacing. 

I developed this transfer technique for doing glitter appliques. I've blogged about it, in greatest detail here:http://glitteringshoes.blogspot.com/2013/06/transfers-mini-how-to-guide.html

Essentially, I write letters on a ziploc bag in Scribbles paint then shake glitter over the lettering while the paint is still wet enough to hold the glitter. I let it dry overnight (sometimes longer if the paint is really thick) and then the letters peel right off the ziploc. If they don't peel cleanly, the paint probably isn't totally dry – I’d wait a little longer, especially if the paint was thick. Then I glue them on the shoe with E6000. The nice thing about the transfer technique is you can try out how you want the letters spaced before you glue them down. 

I usually free hand the lettering these days, but it's also really handy to print out letters, put the paper inside the ziploc bag and trace, especially when you're matching a specific font or logo. For example, I using tracing for the "Roman Chewing Candy" letters for this shoe: http://www.pinterest.com/pin/535013630704521662/

In the beginning tracing is a big help. A modification of the tracing approach is to put graph paper inside the Ziploc bag and use the grid to guide your lettering. I use graph paper to make NOLA tiles on shoes like these: http://www.pinterest.com/pin/535013630706930710/ I make the tile lettering in two steps: first I make the background squares, let those dry, then add the letters on top.

I pretty much only use Scribbles 3-D paint for the lettering. It's got a good viscosity and doesn't collapse when it dries. I usually buy them when Michael's is offering a 25% off total purchase coupon because they rarely go on sale and the little individual bottles are too cheap to be a good use of a 40% off coupon. Another good approach would be to use a Michael's 40% off coupon on one of the 6-packs. I've also bought variety packs on Amazon: Variety Pack of Scribbles paint on Amazon

I like to do 2 or 3 iterations of anything I'm transferring so if something gets a little smudged on one or doesn't look quite right when it dries, I can pick out the best of the bunch. Some of the links in my Techniques Pinterest board cover similar approaches: http://www.pinterest.com/shoeglitternola/techniques/

If you have any questions, or anything that you're not clear on, please leave a comment here and I’ll edit this write-up. When I get more time (not super likely to be any time soon with a newborn in the house), I may add some pictures, but I promise it's very simple.

Hope this helps - Happy Shoeing!!